Quantcast
Channel: The Nautical Sextant
Viewing all 37 articles
Browse latest View live

A Fine Sextant from Spencer, Browning and Co.

$
0
0

Previous posts in this category include:  “A C19 Sextant Restoration” , “Making a Keystone Sextant Case” , “Restoring a C. Plath Drei Kreis Sextant” , “Heath Curve-bar sextant compared with Plath” , “A Drowned Husun Three Circle Sextant”, ”Troughton and Simms Surveying Sextant” , “A Sextant 210 Years On” , “A fine sextant by Filotecnica Salmoiraghi”, “A British Admiralty Vernier Sextant”, “An Hungarian Sextant via Bulgaria” ,  “A Half-size Sextant by Hughes and Son” and “A Fine C Plath Vernier Sextant”, “Heath and Co’s Best Vernier Sextant.” and “An Early C19 Ebony Quadrant Restored”.

Recently, I was made the guardian of an exceptional nineteenth century sextant made by Spencer, Browning and Co. The owner, whose father had bought it in an antique shop fifty years previously, did not wish to see it on e-bay, and I am flattered that he took the trouble to send it half-way around the world to me for me to look after.

The firm of Spenser, Browning and Co. has a long history going back even further than Richard Rust, who was apprenticed  to his master, possibly a John Rust, for a term of seven years. Rust in turn was apprentice-master to William Spencer, who joined him at the age of about fifteen in 1766, to Samuel Browning in 1768, and to Ebenezer Rust in 1770. Ebenezer was probably Richard Rust’s nephew. Spencer and Browning formed a partnership in 1778 which lasted to 1781 and in 1784 the partnership was reformed by the inclusion of Ebenezer Rust. The members of the partnership were described as “grocers”, which at that time meant “a trader in gross quantities” and included such trades as mathematical instrument makers. Originally trading from 327 Wapping High Street in London, they later moved to 66 Wapping High Street, a site now occupied by modern apartments.

Sam Browning married Spencer’s sister, Catherine, and their sons Richard, William and Samuel were in turn apprenticed to their father. William Spencer and his wife Anne had no children, but their nephews Samuel, John, Anthony and William Spencer were apprenticed to their uncle William. Ebenezer Rust’s son, also Ebenezer, was apprenticed to his father in 1795. With so many family members involved we may surmise that the firm of Spencer Browning and Rust was very successful, as witness to which is the relatively large number of their instruments that survive in museums and collections. Of the original partners, Ebenezer Rust died in 1800, William Spencer in 1810 and Samuel Browning in 1819. Upon the death of the younger Ebenezer in 1838, the firm became Spencer, Browning and Co., which continued to trade until 1870.

Figure 1: Restored sextant and case.

Figure 1: Restored sextant and case.

Thus, the instrument, shown restored in Figure 1, can be placed between 1838 and 1870. Its keystone case, I would suggest, places it in the earlier part of this period, although one with a similar serial number in a collection is provided with the more convenient rectangular case. What is clear is that the sextant, readable to 135 degrees, is a high-end instrument. Immediately obvious (Figure 1) is the handle of ivory and , inside the case, the large kit of telescopes. (You can enlarge all the figures by clicking on them. Return to the text by using the back arrow)

Less obvious is the arc of gold inlaid into a limb of silver (Figures 2 and 3), but in case anyone might be in doubt, the words “Gold in silver” appear at the left end of the limb.

Figure 2: Face of limb and arc.

Figure 2: Face of limb and arc.

Figure 3: End view of limb and arc.

Figure 3: End view of limb and arc.

The structure of the limb follows eighteenth century practice, as one would expect of a company whose seniors trained at the end of that century and whose successors were their relatives. Usually, a limb of brass was screwed and sweated on to the face of the bronze frame  and a dovetailed segmental groove machined in it. A strip of silver would then be hammered into the groove and machined flat (See “A Sextant 210 years on”). The reason for using silver is well-known. The brass of the time was hammered and rolled into sheets and there were frequent hard spots in it which could divert the scriber of the dividing engine. Silver, by contrast, was available in  a pure and soft state.  The reason for attaching the brass limb to the bronze casting of the frame is less clear. The bronze of the day was perhaps higher in tin content than in later instruments and was sometimes described as “bell metal”, a hard and tenacious metal which would have been very difficult to machine at such a large radius on the sort of lathe likely to be available to instrument makers of the time. It is easy to forget that thee was no powered machinery and lathes had to be turned by hand or foot. It is true that large and rigid  lathes were coming into being in the first half of the nineteenth century, but these were to be found in the workshops of steam engine builders and the like. Interested readers can find more details in LTC Rolt’s book “Tools for the Job.” I surmise that attaching the softer brass limb was a means of getting around a machining difficulty.

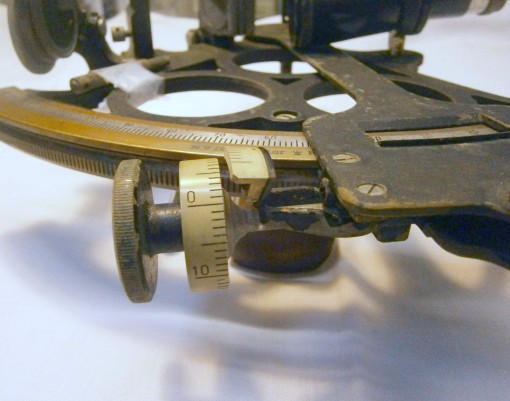
I have occasionally seen sextants with the usual arc of silver but having a gold vernier. The combination gives improved contrast of the scales, but this is the first time I have seen one which has a gold arc too. As well as perhaps reflecting the wealth of the owner, there is a more practical reason for having a golden arc: gold does not tarnish as does silver and so never needs to be cleaned, with the attendant risk of damaging the almost impossibly fine graduations. Even if polishing does not remove the graduations altogether (and I have seen a sextant in which the arc has been reduced to unreadability for this reason), it tends to round their edges, making it more difficult than usual to read a vernier against them. Figure 4 shows how beautifully sharp the graduations remain. Also visible in this figure at the top left of the limb is the ghost of a screw head, which has been used to attach the limb, its head then being riveted into the limb and machined flush. Sextants with platinum arcs are occasionally seen. Surprising as it might seem, this was at first an economy measure, as it was cheaper than silver in the early nineteenth century, because no use could be found at the time for this relatively chemically un-reactive and difficult-to-work metal.

Figure 4: Close-up view of graduations.

Figure 4: Close-up view of graduations.

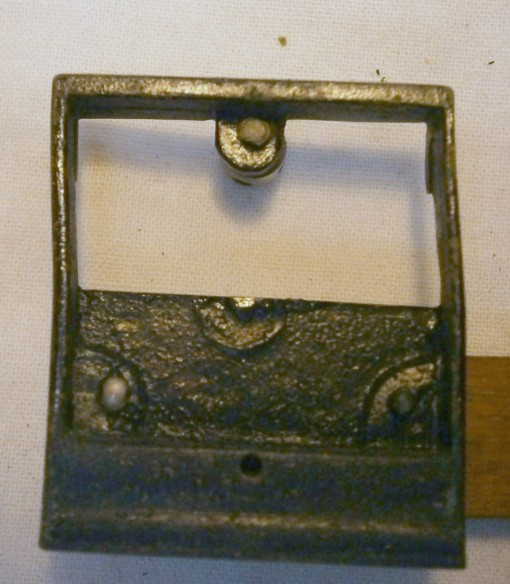
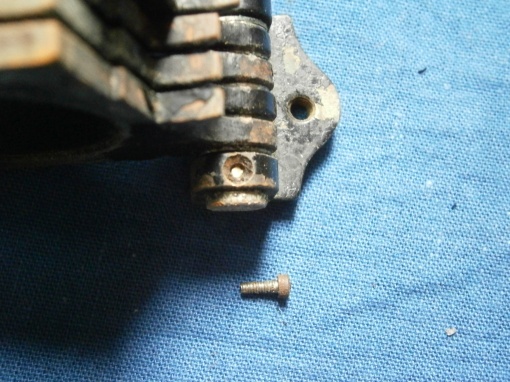
Figure 5 shows the index mirror bracket. This uses the familiar three-point bearing for the back of the mirror, and the next figure, Figure 6, shows the clip which holds the mirror to the bracket directly over the points. A screw through the centre of the back of the clip and bearing on the back of the bracket pulls the clip back on to the mirror. In 1772 Peter Dollond claimed to have invented this system. At any rate, he was granted a patent for it, though he may not have invented it, as in the eighteenth century patents were about monopoly rather than originality.

Figure 5: Index mirror bracket.

Figure 5: Index mirror bracket.

Figure 6: Index mirror clip.

Figure 6: Index mirror clip.

The shades and the horizon mirror follow a pattern that became quite standard in the first half of the twentieth century. Indeed, the horizon mirror is perhaps remarkable for the absence of the complications that characterize the adjustments of many nineteenth century instruments (Figure 7).  It has the three point mounting for the mirror with two adjusting screws to correct for side and index error, with the added refinement of screw caps to protect the screws, one of the requirements for the sextants of British naval cadets in the latter part of the century (they also had to have class A certificates from Kew Observatory).

Figure 7: Index mirror and shades.

Figure 7: Index mirror and shades.

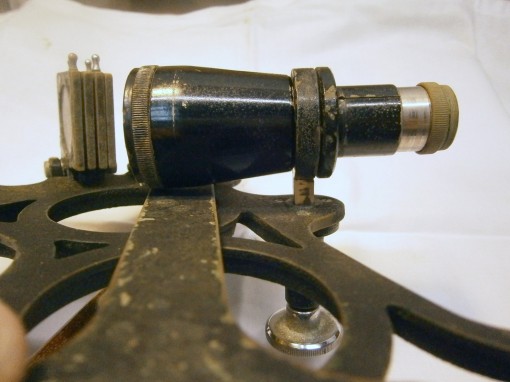
Figure 8 shows structures in the region of the magnifier. The magnifier itself is a Ramsden compound type. It is not clear to me what purpose was served by the large surrounding disc unless perhaps to cut down glare. Many sextants have a ground-glass diffusing screen, but this one is hinged and can be folded down flat. Engineering students are (or more likely nowadays, were) taught to read a vernier scale by arranging the light to shine along the graduations, but this seems to fail with the sextant, in my hands, since the main scale always looks much darker than the vernier, sometimes to the point of unreadability. I find the scales much easier to read when the light shines across the graduations, but even so I have yet to come across a vernier divided to ten seconds in which I can definitely say which of three or four pairs of lines coincide, even using a x30 microscope with axial illumination. The best I can do is to choose the two pairs of lines which just do not coincide and to choose the middle value between them.

Figure 8: Scale magnifier.

Figure 8: Scale magnifier.

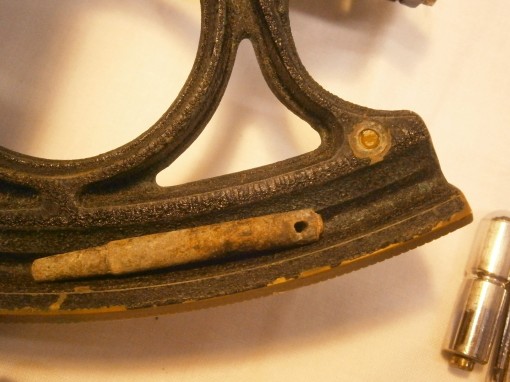
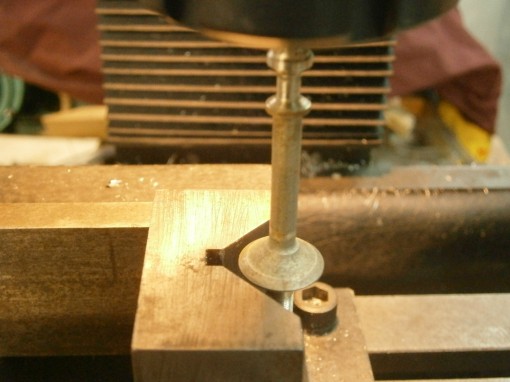
The telescope rising piece and collimation ring, both of conventional form, needed only cleaning and re-greasing, but the same was not true of the index arm. After dismantling it I found that the index arm expansion was bent and twisted, so that the vernier scale could not be brought to lie flush with the arc. This seems to be a common consequence of dropping or bumping the instrument as the cut-outs in the index arm expansion severely weaken it and little force is needed to bend it. Figure 9 shows the tapered gaps quite clearly as well as showing the state of the paintwork before restoration. Tightening of the index arm clamp only made matters worse, so I had to reassemble the clamp and carefully first correct the twist and over-correct the longitudinal bend until the feather edge of the vernier sat squarely on the arc when the clamp was tightened.

Figure 9: Bent index arm.

Figure 9: Bent index arm.

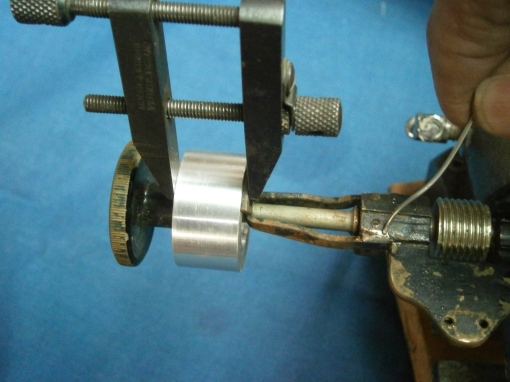
Figure 10 shows the index arm clamped, with the fault corrected.

Figure 10: Bent index arm corrected.

Figure 10: Bent index arm corrected.

The rest of the restoration consisted of the by-now-usual dismantling down to the last screw, cleaning all the parts, polishing and lacquering screw heads and other brass parts usually left bright and spraying other parts with black lacquer to reproduce as closely as possible the original finish. The case seemed to have suffered from modern central heating, which tends to dry out wood and cause it to shrink and crack where it is restrained by screws. The large shrinkage crack in the top is shown in the un-restored case in Figure 11. I decided to fill the crack with mahogany paste, but if it had been much larger, I would have been tempted to remove the top, complete the crack with a saw cut, plane the edges and glue in a strip of approximately matching wood. This process applied to the base of a sextant case will be shown in my next post.

Figure 11: Unrestored case.

Figure 11: Un-restored case.

Happily, what appeared at first sight to be worm holes in the bow front of the case turned out to be fly deposits (flies alight on surfaces after feeding and regurgitate their fluid meal, prior to sucking it up again…). The French polish on the sides was much battered and dented, and would have required major repairs, but I felt it worthwhile to strip the top and re-polish it to show off the grain of the wood. to better effect.

The interior of the case too was battered and some of the blocks for retaining the telescopes and sextant were absent, so I made this good and renewed all the felts. The original interior finish in matt black paint was in poor condition, so I repainted it as close to the old finish as possible (Figure 12). The lacquer on the telescopes and sighting tube was flaking and decayed so this too I renewed. I imagine some antique dealers might be horrified at this loss of “valuable patina”, but in my view, the instruments do not need it to be placed in their era. No one, after all, objects to antique cars being refinished, indeed they are much less valuable in a rusty and battered state.

Figure 12: Interior of case with telescopes.

Figure 12: Interior of case with telescopes.

The rule with telescope kits seems to have been that “more is better”. There is a 4 x 18 mm Galilean or “star” telescope, a 6 x 18 mm inverting telescope with an additional eyepiece giving a x 10 magnification, a zero magnification sighting tube and a 18 x 18 mm telescope with additional lenses to give an erect image. It is difficult to see what practical  the purpose the latter telescope served except perhaps to add prestige to the whole kit. The kit is completed by a single deep red eyepiece shade that screws on to any of the eye pieces. The star telescope would probably have received the most use, by day or night, while the higher magnifications would have been reserved for use with an artificial horizon on land in remote places to check the rate of the chronometers. The 6 x 18 inverting scope may have been used in calm seas for sun sights, while the sighting tube would be reserved for rough conditions and for taking angles between shore objects.

If readers have comments, or corrections, or have some question about this instrument, I am happy to receive them and to comment in turn when appropriate.


The Observator Mark 4 sextant

$
0
0

Rather Like C Plath’s Navistar Professional sextant (see Eighty Years of Carl Plath Sextants, 13 November 2012), the Observator Mark 4 sextant arrived on the scene from Rotterdam just in time to be made obsolescent by the advent of global positioning systems.  Like the Navistar Professional, it too had features that were probably a source of annoyance to the practical navigator. Figure 1 shows a general view of the front or left-hand side of the instrument. (All figures may be enlarged by clicking on them. Return to the text by using the back arrow.) There are several striking features: the frame has none of the traditional bracing; there are no shades to be seen; the index arm is on the back of the frame;and the very squat telescope is almost as one with the frame, as well as having a variety of knobs.

Figure 1: General view of front of sextant.

Figure 1: General view of front of sextant.

On turning over the instrument to see a rear view (Figure 2) it becomes immediately apparent that it is a little awkward to do so with one hand because of the shape of the frame. The handle is then seen to be a very stout alloy casting attached only at the top by three Allen screws, and the micrometer mechanism is seen to be totally enclosed within a U-shaped casting attached by three screws to the lower end of the index arm. A further knob is revealed on the back of the telescope.

Figure 2: General view of the rear.

Figure 2: General view of the rear.

Figure 3 shows the structure of the frame, a heavy, monolithic aluminium alloy casting 15 mm thick, with the index arm bearing and the rack machined directly into it and with the engraved arc screwed and glued to the limb. The whole instrument weighs 1.9 kg (4 lbs 3 oz), rivaling the heaviest of traditional bronze sextants.

Figure 3: The naked frame.

Figure 3: The naked frame.

The word “bearing” is often taken to mean the rotating part plus its enclosure, but strictly, the central rotating part is the journal and the enclosure in which it rotates is the bearing; and I have kept to this traditional nomenclature in Figure 4. The large diameter journal carries the index mirror bracket which is attached to it by two screws from below. The large diameter bronze journal rotates in the bearing which, as in the Soviet SNO-T sextant and the Freiberger sextants, is machined directly into the frame and which seems to be anodised for hardness. The upper end of the index arm and a retaining washer are located by a central spigot on the journal and attached by means of two countersunk screws from the rear. The index arm is a piece of 25 x 5 mm rectangular aluminium alloy stock.

Figure 4: The index arm bearing parts.

Figure 4: The index arm bearing parts.

The index mirror measures 25 x 50 mm and has the usual springs to retain it in its bracket and  an Allen screw on the rear to adjust for perpendicularity. The horizon mirror (Figure 5) is of the same size and is fully silvered. That is to say, there is no plain glass portion through which the horizon is viewed, but rather it is viewed directly. With a half-silvered mirror, about 10 percent of the light from the index mirror, assuming it is of a size to do so, is reflected off the front and back surfaces of the unsilvered portion of the glass and the effect when the telescope is a Galilean type is to widen the area of view where the direct and reflected images coincide. This makes it rather easier to judge when the observed body and the horizon coincide. The top of the bracket, otherwise identical to the index mirror bracket, has been machined away so that the view over the edge of the mirror is unimpeded. There are the usual springs and screws to adjust for side and index error. Both brackets are very robust and strongly mounted, and it would take considerable force to displace them.

Figure 5: Horizon mirror and bracket.

Figure 5: Horizon mirror and bracket.

The telescope, which contains the shades within it, is perhaps the most unusual feature of the Observator Mark IV sextant. Figure 6 is a cross section through the telescope, modified from Figure 3  of the patent document for the sextant, filed in December 1982. The telescope is a Galilean type in which, in effect, light from the left half of the field stays in the left half of the telescope while light from the right half of the field stays on the right. This is perhaps easier to understand by covering half of the objective lens of such a telescope, when it will be seen that the corresponding half of the field will go dark, but if this is repeated with a Keplerian or inverting telescope, the field will simply go dimmer, while the full field of view is retained.

Telescope section

Observator took advantage of this characteristic of the Galilean telescope by inserting a filter or shade in each half of the light path inside the telescope, so that the intensity of light from the observed body and from the horizon could be independently controlled at the telescope by means of curved filters of continuously varying density, from light orange to deep red. To make quite sure that no light from the body could pass through the lighter horizon shades a central flat diaphragm lies along the axis of the telescope, as seen in Figure 7, which also shows the objective lens in its cell.

Figure 7: Central axial diaphragm of telescope.

Figure 7: Central axial diaphragm of telescope.

Figure 8 shows the form of one of the shades, in which a piece of coloured photographic film is held in a curved holder which can be rotated by means of a large external knob to bring different parts of the film into the light path. There is also a semi-circular notch in the bracket that allows light to pass unimpeded.

Figure 8: Details of shade mounting.

Figure 8: Details of shade mounting.

Focusing is carried out by moving the objective lens axially by means of an external knob and a crank that engages with a  slot in the objective lens mounting (Figure 9). Magnification is about four times and colour correction is not complete, with coloured fringes being visible on a bright horizon, though as soon as the filters are deployed this is unlikely to be a problem. Operation of the focus and shades controls is easy.

Figure 9: Focusing mechanism of telescope.

Figure 9: Focusing mechanism of telescope.

The main advantages claimed for the telescope are that the shades are kept free from dirt and damage, inside the telescope. These advantages have been bought at the cost of complication, balanced by the negligible cost of the photographic film, but the film is practically in the focal plane of the objective lens, and in my example the index filter had been damaged by heat. This was easily remedied by reversing the film edge for edge in the bracket.

Figure 10 shows the micrometer mechanism detached from the index arm. End play of the worm in its bearing is taken up by a spring pressing on a ball bearing. The bearing of the worm is screwed to a bronze swing arm that swings about a pivot under the influence of the release catch, the end of which is just visible in the Figure 10 above the worm. The catch passes through a slot in the base of the micrometer mechanism casting and acts as a crank to rotate the swing arm and its attached worm out of engagement with the rack. Many sextants when dropped suffer damage to the release catch and shades, but the one is very robust and the other out of danger inside the telescope. Although in a classical sextant there may also be a worry that the frame has been bent, this is unlikely in an alloy-framed instrument and it is difficult to imagine that it might happen to the frame of this instrument.

Figure 10: Micrometer mechanism removed from index arm.

Figure 10: Micrometer mechanism removed from index arm.

The exploded view of the mechanism in Figure 11 shows how a leaf spring beneath the swing arm presses the worm into engagement with rack. The 15 mm diameter drum is divided into minutes and, unlike that of the Plath Navistar Professional, is easy to read, though there is no provision made to illuminate it.

Figure 11: Micrometer mechanism details

Figure 11: Micrometer mechanism details

The case is made with solid mahogany walls with corner rebate joints and plywood top and bottom. The hinges and other hardware are of plated steel. It is provided with an oil bottle and an Allen key for adjusting the mirrors.  The index arm must be set at 45 degrees in order for the sextant to fit face down in the case, a minor annoyance only. If it is necessary to set it down on a flat surface, it tends to rest on the telescope and micrometer, both of which are rugged enough to stand it,  rather than on a mirror or shade as in conventional instruments.

Figure 12: Sextant stowed in its case.

Figure 12: Sextant stowed in its case.

This is a rugged, practical instrument with few weak points other than the fully silvered horizon mirror and poor colour correction of the telescope.

If you have enjoyed reading this account, you will probably enjoy reading my book on the structure of sextants, “The Nautical Sextant,” and if you are interested in the instruments of navigation, my other book, “The Mariner’s Chronometer,” may also be of interest to you


A Half-size Sextant by Lefebvre-Poulin

$
0
0

Previous posts in this category include:  ” A Fine Sextant by Spencer, Browning and Co”,  “A C19 Sextant Restoration” , “Making a Keystone Sextant Case” , “Restoring a C. Plath Drei Kreis Sextant” , “Heath Curve-bar sextant compared with Plath” , “A Drowned Husun Three Circle Sextant”, ”Troughton and Simms Surveying Sextant” , “A Sextant 210 Years On” , “A fine sextant by Filotecnica Salmoiraghi”, “A British Admiralty Vernier Sextant”, “An Hungarian Sextant via Bulgaria” ,  “A Half-size Sextant by Hughes and Son” and “A Fine C Plath Vernier Sextant”, “Heath and Co’s Best Vernier Sextant.” and “An Early C19 Ebony Quadrant Restored”.

A few months ago, I acquired an unusual little sextant, but was only recently able to collect it in Europe and bring it home to New Zealand for cleaning and overhaul. According to the seller, it had been found in the attic of a merchant seaman who had been active in the 1950’s, but there was no other information about its origins. It bears the name “Lefebvre-Poulin, Montrouge, but the naming of French sextants is rather confusing. Poulin made sextants in the second half of the 20th century in Montrouge in the south-west suburbs of Paris, but Jules Lefbvre was active in central Paris in the latter half of the nineteenth century, so it is unlikely that there was an association between the two makers, and the name of Poulin is sometimes associated with Blanchet.

Apart from its small size, there are one or two other unusual features such as its handle and its micrometer drum, which spans two degrees. Figure 1 shows a front view of the un-restored instrument and Figure 2 gives a rear view. You can get a magnified view of all figures by clicking on them. Return to normal by using the back arrow.


Figure 1: General arrangement, front view.

Figure 1: General arrangement, front view.

Figure 2: General arrangement, rear view.

Figure 2: General arrangement, rear view.

To help readers who have not yet had the wisdom to buy my book, “The Nautical Sextant“, in Figure 3 I show the restored sextant with its main parts labelled.

Figure 3: Main parts of the sextant.

Figure 3: Main parts of the sextant.

At the heart of any sextant is the frame and its bearing for the index arm. In this case, the frame is of an aluminium alloy with a cast-in bronze rack for the micrometer and a bronze bearing for the index arm. The latter also serves as a point of attachment for the unusual handle (Figure 4).

Figure 4: To show handle.

Figure 4: To show handle.

The hexagonal alloy handle screws over the index arm bearing (Figure 5) and is locked in place by two Allen grub screws. The bearing itself is attached to the frame by three brass screws.

Figure 5: Index arm bearing, and handle attachment.

Figure 5: Index arm bearing, and handle attachment.

The vast majority of sextants ever made had tapered index arm bearings, but as micro-finishing of plain parallel bearings advanced in the second half of the twentieth century, C Plath and Observator made use of the new technology in their sextants. As Figure 6 shows, Poulin followed suit in this sextant. The parallel steel journal rotates in the bronze bearing (strictly speaking, the bearing is the enclosure in which the shaft or journal rotates), and is secured against axial movement with a phosphor-bronze spring washer and a brass screw. No provision is made for adjustment as no wear is to be expected in the slow-moving, lightly-loaded bearing.

Figure 6: Exploded index arm bearing.

Figure 6: Exploded index arm bearing.

Figure 7 shows the rack with a view of the micrometer mechanism. The bronze rack appears to be cast in to the frame and its pitch is relatively large for its radius of about 80 mm, so that one turn of the micrometer worm advances the sextant reading through two degrees. Henry Hughes and Son in their WWII half-size seaplane sextant reduced the pitch of the rack  so that they could use most of the components of the full-sized micrometer mechanism, needing to modify only the pitch of the worm to match the rack. Their micrometer advances the sextant reading through one degrees per rotation of the worm (see my post of 26 September 2011).

Figure 7: To show the rack.

Figure 7: To show the rack.

The micrometer mechanism is of conventional design (Figure 8). The lower end of the index arm carries a post for the bearing of a swing-arm chassis to which the plain parallel bearing of the micrometer worm shaft are attached. A large leaf spring (radial preload spring) holds the worm in contact with the rack and a simple cam allows the worm to be swung in the plane of the frame out of contact with the rack against the spring pressure. This allows the index arm to be moved rapidly into position before releasing the catch to re-engage the worm for final adjustment. A smaller leaf spring (axial preload spring) bears on the end of the worm shaft to take up any axial play in the bearings. Also shown in the figure are the two keepers, which prevent the index arm from lifting away from the front of the frame.

Figure 8: Micrometer mechanism.

Figure 8: Micrometer mechanism.

Since one rotation of the worm with its attached micrometer drum advances the reading through 2 degrees, the drum is divided 0 to 60 minutes twice with subdivision to minutes (Figure 9). The main scale on the limb and the micrometer drum are divided to single degrees and minutes respectively, with alternate tick marks being long (Figure 10). At first sight, this gives the impression that half-degrees and minutes are being shown and it might have been easier to read had the normal practice been followed of making the 5  tick mark longer than the others.

Figure 9: Micrometer drum divisions.

Figure 9: Micrometer drum divisions.

Figure 10: Main scale close-up view.

Figure 10: Main scale close-up view.

The shades are unremarkable except that there are only two index shades instead of the more usual three or four and one horizon shade instead of two or three. No provision is made to prevent the index shades rotating together, but as there are only two of them this does not pose much of a problem. The two shades together give adequate reduction for viewing full sun and the single horizon shade also gives adequate reduction of glare beneath the sun.

The mirrors and their brackets are conventional. The horizon mirror is fully silvered, but there is adequate overlap of the direct and reflected images when viewed through the 4 x 25 mm Galilean telescope; though the field of view is somewhat restricted, I found no difficulty in finding the sun, though with star sights the story might be very different.

I have not been able to discover for whom this instrument was intended. Its small size and simplicity suggests it might have been aimed at yachtsmen, for whom storage space may be at a premium. It may also have found the occasional sale among surveyors and explorers. A merchant marine officer is unlikely to have wished to be seen using anything other than a full-sized instrument. It came to me without a case. Monsieur Hervé Le Bot has kindly provided me with a photograph of the case interior, which is shown in Figure 11. Unusually, the sextant is stowed in its case upright, in a socket which accepts the hexagonal handle and which has cheeks to prevent it from rotating.

Figure 11: Interior of case (courtesy of M. H Le Bot)

Figure 11: Interior of case (courtesy of M. H Le Bot)


How to refill C Plath bubble artificial horizon

$
0
0

This post is preceded by  “The SOLD KM2 Bubble Sextant”; “C Plath Bubble Horizon Attachment”;“A gummed up AN5851-1 averager”, “Bubble illumination of Mk V and AN 5851 bubble sextants” ,  ”Refilling Mark V/AN5851 bubble  chambers” ,  ”Overhaul of MkV/An5851 bubble chamber” ,  ”AN5851-1 : jammed shades carrousel” ,  ”A Byrd sextant restored” ,  ”Update on Byrd Aircraft Sextant”, “A nautical sextant bubble horizon” and “Sealing A10 vapour pressure bubble chambers.”

A friend recently asked me to refill the bubble unit of his C Plath artificial horizon. Someone had been there before me and mutilated the retaining ring for the top glass and left a leaky bubble chamber, but there was enough ring surviving for me to be able make a repair. Her’s how I did it in (mainly) pictures. Read this in conjunction with the post of 26 June 2012.

Figure 1: remove plate.

Figure 1: remove plate.

Figure 2: Remove lamp holder.

Figure 2: Remove bulb carrier.

Figure 3:

Figure 3:Displace bulb mount.

Figure 4: Remove bubble unit.

Figure 4: Remove bubble unit.

Figure 5: Remove top retaining ring.

Figure 5: Remove top retaining ring.

To remove the ring you will need to make a little tool from a piece of 10 mm square steel. File the corners off to make a symmetrical octagonal shape until it fits in the octagonal hole in the ring. You don’t have to fit a tommy bar. You could use a 10 mm AF wrench instead.

Figure 6: Remove washer.

Figure 6: Remove washer.

Figure 7: Remove another washer, carefully.

Figure 7: Remove another washer, carefully.

Figure 8: Prise out glass, even more carefully.

Figure 8: Prise out glass, even more carefully.

Figure 9: Rinse and add fluid as necessary.

Figure 9: Rinse and add fluid as necessary.

You can use absolute alcohol if you can get it, gin or vodka. I prefer to use iso-propyl alcohol (isopropanol) because the de-natured ethanon I can get is coloured purple. In an ordinary level tube I bleach it with a drop of household bleach, but am uncertain about its long-term effects in a metal and glass chamber. When you cannot draw any more fluid in, over-fill the chamber and add the glass, remembering to put it with the the concave recess down. A syringe with a 23 or 25 gauge needle is handy for adding the fluid.

Figure 10: Form bubble.

Figure 10: Form bubble.

If a bubble isn’t trapped under the glass, left one edge to let in a little air, about this much:

This should be as big as it gets.

This should be as big as it gets.

Replacing the bubble unit is the reverse of removing it.


Ilon Industries Mark III Sextant

$
0
0

Of the many small-size sextants, possibly the rarest are those by Ilon Industries Inc of Port Washington, N.Y.  Victor Carbonara, a prolific inventor of navigational instruments prior to  and during the Second World War and one-time president of Kollsman Instruments, manufacturer of altimeters and bubble sextants, may have had something to do with its design. However, I have not been able to discover any details about Ilons. I was very pleased, then, when an Australian friend, one of the many friends I have yet to meet, entrusted me with his Ilon Mark III sextant and invited me to describe it, deconstructing it in the process if need be. The sextant is in a stout leather case with a metal zip fastener (Figure 1)

Figure 1: Case

Figure 1: Case

The interior of the case is lined with red velvet, with compartments for the sextant body, an adjusting key, the handle, a sighting tube and a tiny prismatic telescope, as shown in Figure 2. A clearer view of the individual parts is given in Figure 3, which shows the parts outside the case.

Figure 2; Kit of parts in the case.

Figure 2; Kit of parts in the case.

Figure 3: Parts out of case.

Figure 3: Parts out of case.

Figure 4 names some of the parts of the sextant for those who are not very familiar with sextant structure. The telescope is six power with an aperture of 15 mm.

Figure 4: Some of the main parts.

Figure 4: Some of the main parts.

While it is quite usual for sextants to be stored without their telescope in place, it is very unusual for the handle to be a separate part.  The sextant has a front plate which carries the telescope, the index arm with its attached micrometer mechanism, a rack with which the micrometer worm engages, the arc and the two mirrors. The front plate  is attached via two pillars and a plate through which the telescope passes, to a back plate to which are attached the shades and the handle. Figure 5 gives some clues as to how the handle is attached. The upper leg of the handle has a cross pin through it and this is inserted into a slotted hole and rotated through about 30 degrees, at the same time engaging a reduced diameter of the lower leg in a plain hole in the back plate. On tightening the knurled locking nut, the handle is located and  held with sufficient firmness to the back plate.

Figure 5: Sockets for handle.

Figure 5: Sockets for handle.

Figure 6 shows the handle locked into place and also shows the means of attaching the telescope or “zero magnification” sighting tube. The ‘scope or tube screws into a dovetail slide which engages with dovetails machined in the plate that holds the rear of the the two plates together. The ‘scope can be moved transversely to admit more or less light from the horizon, depending on conditions, and then locked into place by means of a locking nut bearing on the upper gib strip. This takes the place of the conventional “rising piece”. While the human eye can just about detect a doubling in light intensity, quite small changes in intensity can improve contrast between the sky and the horizon at twilight significantly.

Figure 6: Handle locked into place.

Figure 6: Handle locked into place.

Figure 7 shows how the index and horizon mirrors are tucked away safely between the plates. It also shows how up to three index shades and two horizon shades can be rotated on brackets attached to the inside of the back plate to reduce light intensity from the observed body and the horizon respectively.

Figure 7: Shades and mirrors.

Figure 7: Shades and mirrors.

The radius of the arc is a mere 60 mm (about 2.4 in.) It is traversed by an index arm outside the front plate and which rotates about a short plain bearing, the other side of which is a plate carrying the index mirror bracket. A magnifier built into the lower end of the index arm helps in reading the whole number of degrees (Figure 8).

Figure 9: Micrometer index.

Figure 8: Micrometer index.

A rack is machined into the rear of the front plate and is engaged with the worm of the micrometer mechanism (Figure 9). An 18 mm diameter micrometer drum allows single minutes to be read off with ease. The mechanism follows the practice of Heath an Co in swinging the worm out of  the plane of the rack by means of a spring loaded release catch, so that the index arm can then be moved rapidly.. The swing arm that carries the worm in its bearings rotates between cone-ended screws that can be locked in place when all backlash has been removed.

Figure 8: Micrometer mechanism.

Figure 9: Micrometer mechanism.

Axial play of the worm shaft is removed by an adjustable bush that is also locked into place when it is judged that there is no axial play of the worm in its bearings (Figure 10). A tongue (best seen in Figure 9) forming part of the rear swing arm trunnion bearing projects to form a keeper that prevents the index arm lifting off the front plate.

Figure 9: Detail of micrometer mechanism.

Figure 10: Detail of micrometer mechanism.

Figure 11 shows the light path, in red from a heavenly body at about 60 degrees altitude and in yellow from the horizon. Both mirrors have their reflective surface on the front and presumably this was chosen so that they could be cemented firmly into their brackets without the need for clips, which, at this scale would be extremely small and fiddly to fit. The horizon mirror has no clear-glass portion and the light from the horizon simply passes over the top of the mirror to combine with the rays from the observed body. In some respects, this is a disadvantage as the clear portion of the more usual horizon mirror reflects about 10 percent of the light coming to it from the heavenly body and increases the overlap in the view of the body and the horizon.

Figure 10: Light path.

Figure 11: Light path.

Figure 11 shows some of the structure of the horizon mirror bracket. Horizontal and vertical slots almost meet, leaving a slightly flexible diaphragm of metal between, so that the mirror can be adjusted in the vertical plane by two screws, the nearer one of which in the photo, as it were, pushes, while the other pulls. The two are adjusted against each other to correct side error. This is seen in a different view in Figure 13. The index mirror bracket is slotted in a similar way to allow adjustment for perpendicularity in the usual way.

Figure 12: Detail of horizon mirror bracket.

Figure 12: Detail of horizon mirror bracket.

To adjust for index error, the whole bracket rotates about a screw through the plate and two adjusting screws bear against each other on the opposite sides of a post. When adjustment is complete, the screw through the plate is locked.

Figure 13: Horizon mirror adjustment.

Figure 13: Horizon mirror adjustment.

It is not clear for whom this interesting little sextant was intended. Produced in small numbers, it must have rivaled a full-sized sextant for cost. There are plenty of box sextants around, but the Ilon is much easier to read than the crowded vernier scale of a box sextant and though the latter were useful to surveyors for reconnaissance surveys and to artillerymen for setting up their guns, improvements in survey instruments may well have made the sextant redundant for these purposes. The professional seaman is unlikely to have wished to be seen with anything other than a full-sized instrument, leaving only the well-heeled yachtsman or the collector as a possible purchaser. Perhaps this ingenious little instrument was too good for its own good, as they appear to be excessively rare, suggesting perhaps that it did not sell well.

I am grateful to Murray Peake for the loan of his instrument.

3 October 2014: In response to this post, Alan Heldman remarks that the design “…would easily lend itself to giving the user the option of putting the handle on the left side as well as the right side. With the handle on the left-hand side, the user could easily work the micrometer screw with his right hand.” There does not seem any reason why the handle could not be retrofitted to the left plate, though it would have to be almost horizontal and high up to clear the index arm.

Chris White writes “ Just saw the Ilon sextant article. Victor Carbonara was my grandfather and i worked at Ilon for a couple years in the 1970’s. I actually assembled and sold a number of these sextants from the parts inventory years after they had been discontinued.

It is a great sextant for marine use. Fussy to build due to the short arm requiring higher accuracy. “


C Plath Sun Compass

$
0
0
Figure 1: Dan LaPorte's sun compass.

Frontispiece: Dan LaPorte’s sun compass.

This post was preceded by  “A Fleuriais’ Marine Distance Meter” A Stuart Distance Meter”;“A Russian Naval Dip Meter”; and  “An Improvised Dip Meter”

Sometimes, kind people lend me their precious instruments for me to deconstruct and examine so I can post details on this site. I invited Dan LaPorte to contribute a “guest blog post” and he has kindly obliged. Dan’s contribution is in blue, and my comments and additions are in black.

Last year I obtained a WWII Plath sun compass via an e-bay purchase.    At the time I really didn’t know exactly what I had bid on and won, but I did know it was something out of the ordinary.

First, a little about me and why I would be remotely interested in such an item.  I am a retired  US Merchant Mariner having sailed for some thirty-five years at sea, twenty of those as a Ship’s Master.  During that time, I acquired many skills and interests, one of them being magnetic compass correction.  For years I’ve used an Abrams and an Astro sun compass for such duties.  Both work on the same basic principal of local time or hour angle to obtain a true bearing of the sun or other celestial body.  Hence I was immediately interested in the Plath sun compass.

Upon delivery of the item I was saddened to find that the clock work no longer functioned (the Plath uses a Junghans 30 clock work  with optical sight for taking a bearing of the sun).  In fact the Junghans 30 movement was also used in the ME 109 fighter of the same era.   The idea is to set the correct time (more on this later), so the sun compass will track the sun’s path and hence a constant bearing using the sun can be obtained.  When functioning and set correctly a true bearing can be recorded of a landmark to obtain a position, or drive (or fly) from a known position to another by following the desired course.  Another use of the Plath would be to check and correct an aircraft’s magnetic compass while on the ground.  

After a bit of research I found that this model was used almost exclusively by  German troops deployed to the  North Africa corps during WWII.   Of course all this would have been unknown to me if not for the assistance of Mr Malcolm Barnfield.   By contacting Malcolm via his web site: http://www.sundials.co.za , I was able to obtain a wealth of information on the Plath.   Malcolm is without a doubt one of the most knowledgeable people in the world on the topic of sundials, sun compasses and their use.   Without Malcolm’s expertise on the topic I would have certainly been lost for much longer, and perhaps forever.  Malcolm was also good enough to put me in contact with other very talented men, highly regarded on the same topic, such as Mr Konrad Knirim who provided a manual for the Plath, and Mr Kuno Gross, who translated it from German to English for me.  These highly accomplished men in their fields were good enough to assist me in my search for information regarding the Plath. 

While history of the Plath was very interesting, it did nothing to solve the one large remaining problem – it simply didn’t keep time and thus was nothing more than an interesting item to marvel at and only ponder at its use.  

Enter Bill Morris.   Bill and I had communicated for months on various topics related to celestial navigation both air and sea.  Bill is regarded by all that know him as one of the most knowledgeable people in the world where navigation instruments and their structure are concerned.   Bill has written books on the topic and provides detailed manuals for repair of several  sextant types both aeronautical and nautical.   His manuals are truly works of art and allow the layman to repair and bring sextants back to working order.  Bill had in the past repaired an old A10A aircraft sextant for me that works perfectly to this day.  Given his talent for repairs, knowledge of machine tools and ability to work on intricate and complex antiques with a sure touch, I asked if he would be good enough to have a look at the workings of the Plath.   I should state at this point that I was, and remain very protective of the Plath and would not allow just anyone to begin repairs on it.  Bill was my first and only choice that I would trust enough to allow any attempt at repairs.  As luck would have it Bill was to travel to Katy in Texas, not all that far from my home.  Add to this I would be able to finally meet Bill face to face.  In short it was a perfect and fortunate turn of events. 

I was able to meet Bill and his lovely wife for a visit in August of this year.  We enjoyed a very nice chat and lunch, covering topics ranging from navigation to what should be seen while in Texas.   I left the Plath safely in Bill’s hands, with hopes he could repair it.  A mere week later I had the Plath in my hands and working perfectly.

At this point the Plath was repaired, and I had a basic knowledge of how to use it.   When the Plath arrived I at once set it to local standard  time adjusted with the EQT ( Equation of time) from the nautical almanac.  To my dismay it did not point to North or any other direction.  In fact is seemed to be some 15 degrees off to the East at best.  That is, I would have to be another time zone to the East for the Plath to be anywhere near correct in obtaining a true bearing. Adding to my frustration, I was not entirely clear on how to orientate it to obtain a true bearing (the manual giving scant information in the translation). I set both the Abrams and Astro Compass in a hope to clarify the situation, this only proved to entangle my thoughts even more, at least for the moment. 

A few words about the equation of time are perhaps appropriate. Our daily life is governed mainly by the sun and its passage across the sky is not perfectly regular. It slows at some times of the year and speeds up at other. This is partly because the Earth’s orbit is slightly elliptical, so that it speeds up when nearer the sun and partly because the Earth’s axis of rotation is inclined at about 23 1/2  degrees to the plane of its orbit, so that the component of the Sun’s apparent velocity parallel to the equator  varies with the seasons. It is very difficult to make clocks to follow these variations, so the concept of mean solar time was invented, the average time for the Sun’s apparent rotation around the Earth. The difference between the apparent time on a given day and the mean solar time is known as the equation of time, often shown as a graph as in Figure 2, and in the bottom right hand corner of the daily pages of the Nautical Almanac. In the sun compass, it has to be applied as a correction on a given date to the mean time so that the alidade will point correctly to the sun.

Figure 2: The equation of time.

Figure 2: The equation of time.

 After further study I found the problem. To outline what the problems was I first have to explain the use of the two sun compass types I was more familiar with.   As stated previously, my tools used for obtaining a bearing of the sun or other celestial body was the Abrams or Astro Compass.   The Abrams uses local standard time, adjusted east or west of the standard time meridian, the observer’s approximate latitude and an adjustment for EQT provided on the face of the sun compass.  When all these details are known and set the instrument will provide the desired bearing by using the shadow of the sun.  The instrument has to be updated by moving the time marker one mark on the scale every four minutes.  This of course is due to the movement of the sun covering one degree of longitude every four minutes.  Simple when you know how.  The Astro Compass uses the settings of:  Local Hour Angle (LHA), declination of the body and latitude of the observer.  The declination of the body is obtained from the Nautical Almanac, LHA is calculated from your known longitude and applying it to the GHA of the sun or other celestial body.  Latitude of the observer would also need to be known and set on the instrument.  As with the Abrams the Astro needs to be constantly updated by moving the LHA scale in keeping with the sun’s motion across the sky.  

Why am I boring the reader with these details?  Simply to drive home the use of the Plath and the ingenious setting of the unit.  Unlike the Abrams and Astro the Plath is set to GMT standard time (not DST).  The user would also need to apply EQT to the time setting in order to obtain solar time with the EQT sign ( -/+) reversed due to the correction from a local time to GMT.  Once set to GMT – Solar time (GMT with EQT applied) the user then simply sets his latitude and longitude on the Plath.  No further corrections  and no almanac entries are needed.  As long as the Plath keeps correct time, and the user updates the estimated position of latitude and longitude, the unit will continue to function.  My mistake was in setting the Plath to local time.  I had wrongly assumed local time would be used as with my other instruments.  The Plath’s use of GMT is a perfect solution when one has time to reflect on the subject.  

Needless to say when the details of correctly setting the Plath were known and understood another test was in order.   So, one afternoon with the sun high and bright in the sky I set the Plath.  It should be noted that as with all other sun compasses it needs to be mounted securely to a stable platform and levelled with the provided spirit level. I also set the Abrams and Astro compass at the same time, a kind of a sun compass smorgasbord if you will.    To my amazement the Plath indicated true north as checked by my Abrams and Astro Compass (any course could have been selected for the test).  Given that the ultimate test of the Plath was to maintain a true bearing for hours or even throughout the night a test for the rest of the evening continued. I allowed the Plath to run for a few hours checking it now and then.   As per the design, the Plath displayed a constant true bearing until sunset due to the clock works keeping time and following the transit of the sun across the sky.  The Abrams and Astro compass would have had to be manually corrected continually for the entire event.  The value of the Plath became even more clear when you imagine using it in a desert with no natural land marks.  Given the successful test I personally would not have a problem using it for land navigation across a desert to this day if I knew what course I needed to travel from my location to destination.  No need for GPS signals or the like.  Just simple old style navigation would serve the user very well indeed. In fact I’d prefer to use the Plath instead of the Abrams or Astro compass due to the Plath’s ability to constantly maintain the required bearing, thanks of course to the Junghans clock works. 

The final test was the following morning.  As the sun rose in the East the Plath tracked perfectly still displaying the true bearing of North as she was set the evening before.  Perfect!   After seventy plus years the Plath with the assistance of Bill Morris worked as she worked many years ago in the North African desert.

 I wish to thank Dr Bill Morris,  Mr Malcolm Barnfield, Mr  Kuno Gross, and  Mr Konrad Knirim with having similar interest, assisting me, answering my questions, being patient,  and at times commiserating with me on this project.   These men:  doctor, military historian, engineers, authors, experts in their fields, took the time to assist a retired sea Captain with his quest to restore an antique sun compass to operational status.  Simply put, without them and their assistance the Plath would have remained locked away in my study with other odd instruments, not used, not understood and in a non-functional condition.  It would have been an unfortunate end for such a fine instrument.  As it turns out she may well run another seventy plus years.

 Captain Dan LaPorte (ret)

Figure 3: General arrangement.

Figure 3: General arrangement.

Now for a few anatomical details. The compass is mounted on the vehicle or aircraft via a universal joint, which can be quickly locked or unlocked in order to level the base plate (which I have labelled “compass card” in Figure 3 above) using a circular level in the centre of the plate. The base plate index corresponds to the lubber’s line in a magnetic compass and the line can be correctly aligned with the fore and aft axis of the vehicle using a sort of iron sight. In Figure 3 this can be seen as a thin vertical rod in a gap in the trunnion above the W of the base plate. On the other side is a point, just visible in Figure 1. The two trunnions support the horizontal axis of the compass and this axis is provided with a latitude scale on one end and a knurled locking knob on the other. A moment’s thought shows that when the scale is set to the local latitude, the equatorial axis, which I have drawn as a red line, will be parallel to the Earth’s axis. The horizontal axis bears a clock with a twenty-four hour dial and the clock can be rotated inside an equatorial mounting ring provided with a longitude scale and locked at the local longitude.

Figure 4: Equatorial mounting ring and longitude scale.

Figure 4: Equatorial mounting ring and longitude scale.

The watch is provided with a rather unusual hour hand in the form of an alidade (Figure 5a) and also has a conventional minute hand.

Figure 5a: Structure of the alidade.

Figure 5a: Structure of the alidade.

The alidade is made of Perspex (Lucite). One end has a vertical cylindrical lens that projects an elongated image of the sun on to a ground screen at the other end. The screen has two vertical setting lines and a lower, transverse extension to help in initial setting. When the time is set to the correct Universal or Greenwich Mean time, adjusted for the equation of time,  and the latitude and longitude scales set to their local values the base plate is rotated so as to bring the elongated image of the sun between the setting lines. If the vehicle is pointing north, the base plate index will then indicate north. If the vehicle turns and the base plate re-adjusted to bring the sun back between the setting lines, the direction of travel will be indicated by the base plate reading. The clock will keep the alidade tracking the sun correctly as long as the direction of travel does not change and if the direction of travel  does change  it is necessary only to bring the alidade back into alignment to get a correct indication of the new direction of travel. Amateur astronomers will recognise this as an adaptation of the familiar equatorial telescope mounting. The whole is enclosed by a protective Perspex cover. Figure 5b gives another view

Figure 5b

Figure 5b: Further view of alidade and scales.

I do not propose to give many details of the clock mechanism except to point out that, somewhat unusually, it is wound up by rotating the spring barrel rather than by rotating the spring arbor. This allows some simplification of the internal power train and also allows setting of the hands by means of a co-axial arbor (Figure 6).

Figure 6: Winding and setting knobs.

Figure 6: Winding and setting knobs.

Figure 7 shows how power is transmitted to the train from the spring via the central winding gear.

Figure 7: Winding gear detail.

Figure 7: Winding gear detail.

Dan and I would be glad to know of any errors or significant omissions and to hear from other owners about their experience with this ingenious instrument.

Bill Morris

Pukenui

New Zealand


Restoration of an early C19 ebony quadrant

$
0
0

The preceding posts in this category cover : “C Plath battery handle structure; “C Plath sextant lives again”; “C Plath Micrometer Sextant”; “A Damaged Rising Piece”, “SNO-T Mirror Bracket Repair”,  “A Worm Turns”, “The case of the broken screw”, and “Worm with wrong thread angle?”

As I have a limited budget to spend on my hobbies, most of the sextants that I buy are damaged to some extent or missing parts or corroded or all three, but where would the fun be in buying pristine instruments? A little while ago, an ebony quadrant which I guestimate to be from the first half of the nineteenth century came into my hands for much less than an instrument in good condition would cost. My experience may help readers with their own restoration projects. I do not claim to be an expert wood worker or that there are not other ways to proceed, only that my methods work after a fashion.

First a word about the term quadrant. Most mariners of the time would observe a heavenly body to obtain latitude, either by observing the maximum altitude of the sun to obtain local noon or, in the northern hemisphere only, by observing the altitude of Polaris, the Pole Star, again obtaining latitude with only small corrections and the minimum of calculation. As the altitude of heavenly bodies never exceeds 90 degrees, an quadrant would do for the observations. It was also often called an octant, Hadley’s quadrant or simply “a Hadley”.  As rotation of the index mirror through a given angle rotates the reflected ray through twice this angle, each degree on the scale of an octant (or, for that matter, a sextant) is only half a degree of a full circle, so that 90 degrees of measured angle or a quarter of a circle can be accommodated on a scale of only an eighth of a circle in length, hence “octant”. More sophisticate navigators might attempt to obtain their longitude by the method of lunar distance, for which a sextant, able to measure altitudes up to 120 degrees, was required. Figure 1 shows the face of the instrument as received. (Clicking on the pictures enlarges them. Return to the text by using the back arrow). The frame is of heart ebony, a black or dark brown African wood which is very stable and hard. It is also unfortunately prone to splitting and flaking. The figure shows that the octant is very dirty, it lacks the vernier scale and name plate, and the ivory main scale or arc has detached itself from the limb.

Figure 1: Face of octant as found.

Figure 1: Face of octant as found.

The rear view, shown in Figure 2, shows some of these cracks at each end of the limb where the legs of the sextant have been screwed into the back of the frame. It is not possible to see that the tenons are loose in their mortises and that there was a large flake loose in the vicinity of the rear of the index arm bearing. Happily, all the brass parts, including a small Galilean telescope and a sighting tube, were intact. It is interesting to see in the rear view that there are three brass inserts that seem to have no function in this instrument. Some earlier instruments had elaborate methods for correcting side and index error and these brass inserts would have been used to attach these devices. Plainly, there were specialist frame makers, scale dividers, telescope makers, shade and mirror bracket makers and so on. The person who placed his or her name on the instrument, and there was at least one female instrument maker, was very often merely the person who assembled bought-in parts into a whole, rather like modern-day car makers. Perhaps an instrument maker was told that he could have any frame he liked as long as it was the one that the frame maker had in stock.

Figure 2 Rear face of octant as received.

Figure 2 Rear face of octant as found.

Figure 3 shows the mahogany case which from its condition had plainly not been stored in a dry place. As all the joints were loose and the box lock interior was a mass of rust, perhaps it had even been submerged at some point. The base had so many splits in it, with loss of wood around the steel nails that it was beyond repair. One hook latch was still present and it was possible to pull apart the joints easily after removing the top and bottom. The steel screws securing the  hinges had not only corroded beyond saving, but the swelling of the rust had also partly destroyed the surrounding wood. Only one hinge remained.

Figure 3: Case as found.

Figure 3: Case as found.

In the lid were the remains of a label of William de Silva shown in Figure4. In the census of 1881 there was a William de Silva, “Optician” aged 59 years,  living in Liverpool. He was possibly the son of Manuel de Silva noted in the census of 1841 as having been “born in foreign parts.” William had a son, also William, whose age in the 1881 census was given as 36, occupation Master Mariner. Prince’s Dock was begun in 1810 and completed in 1821. Bath Street overlooks the dock. It seems safe to say that the instrument was at some time sold by De Silva and may even have been made by him, in which case it seems reasonable to place it in the first half of the nineteenth century.

Figure 4 : Label of probable maker.

Figure 4 : Label of probable maker.

Figure 6 shows some of the frame repairs in progress. All the brass parts have been removed, the mortise-and-tenon joints re-glued  and the splits repaired. The latter is done by prising  open the split and introducing modern PVA glue into the split, using a fine blade or piece of shim stock to encourage the glue into the deepest recesses. The crack is then forced closed using as many cramps as can be accommodated. At the left of the picture it can be seen that the mortise cut into the right hand end of the limb has split apart and been re-glued. The large flake at the top has been glued back into place and a block of wood used to keep it there while the glue dries. Modern baking paper is very useful to prevent items sticking to things they ought not to. The ivory arc needed careful handling as it had shrunk and detached itself from each end, forming a curve in the process. A previous owner had tried unsuccessfully to replace it using contact adhesive and removing the old glue was a quite difficult job.. I replaced the arc using a modern gap-filling adhesive, but was not entirely successful at preventing splitting at the high end of the arc. However, the shrinkage of the arc meant that it could never again be used in anger so I was not too upset.

Figure 5: Frame being re-glued.

Figure 5: Frame being re-glued.

Re-assembling the case was not too difficult. While the walls and top were apart, I used a cabinet scraper to remove all the old and perished varnish. I find that once the knack of sharpening the scraper has been learned, this is a quicker method of getting down to bare wood, as well as needing less exertion than sanding.  Some splits and shrinkage cracks meant I had to have recourse to glue and mahogany paste to make good the losses. As noted above, the base was beyond repair, so I made a new one from some 5 mm thick mahogany board, cut slightly over-size. My board was not wide enough to cover the whole of the base, so I added a piece to one corner. To make a rubbed joint to unite two pieces of board with glue, it is essential for maximum strength that the edges should be both straight and square. Figure 6 shows how I planed the edges with a smoothing plane fitted with a home-made fence to ensure the edge was square.

Figure 6: Edge planing without tears.

Figure 6: Edge planing without tears.

Figure 7 shows a method of clamping boards of irregular shape while the joint dries. A piece of modern baking paper separates the two parts from a piece of flat and true board. Two clamps hold the large piece immobile and another two clamps hold the smaller piece in contact. It is tapped lightly with a soft mallet until a glue line appears and then the clamps are tightened to hold the boards firmly together.

Figure 7: Clamping an edge joint.

Figure 7: Clamping an edge joint.

Figure 8 shows the finished result.

Figure 8: Finished joint.

Figure 8: Finished joint.

The way the top and bottom of sextant cases are attached varies quite a lot. Unfortunately, steel panel pins were often used on the part of the case most likely to get wet, the bottom, as well as on the top. Slightly higher class cases used brass screws on the top, but even very respected makers sometimes left the unseen bottom to steel pins. Only the best cases had brass screws top and bottom and the really high class ones have the screw slots lined up. The staining from corroded steel pins is difficult to remove and often the pins themselves break as they are being withdrawn so that all one can do is to drive the remnants below the surface and start again with brass pins or screws in different places. Whichever type of hardware is used, it is easier to start by gluing the base or top to the carcass. Figure 9 shows this in progress. A large variety of clamps or heavy weights is indispensable to get a good result.

Figure 9: Base being glued to sides.

Figure 9: Base being glued to sides.

Figure 10 shows excess base being planed away using a block plane on the end grain. I am taking a fine “sciving” or oblique cut. Experienced woodworkers will not need to be reminded not to plane right to the corner, to prevent splitting, but I sometimes forget to reverse the direction of the cut before reaching the corner and others might too.

Figure 10: Planing across the grain of the base,.

Figure 10: Planing across the grain of the base,.

Figure 11 shows the mess left by the swelling of the rusty hinge screws.

Figure 12: Damage from rusty screws.

Figure 12: Damage from rusty screws.

I tried filling them with epoxy putty, but the screws refused to go where I wanted them, always following the path of least resistance, so in the end I cut out all the damaged wood and let in pieces of mahogany Figure 13) for the pair of new hinges. I was not able to match the single remaining original hinge, so replaced them with a pair of mdern brass hinges.

Figure 13: Case repair in vicinity of hinges.

Figure 13: Case repair in vicinity of hinges.

Once the repairs to the case  were complete, I stained the wood to get an appearance similar to that of old dark mahogany and finished with several coats of modern varnish, sanding lightly between each coat. Figure 14 shows the result for the exterior. I used the remaining hook latch as a pattern in order to cut out and file to shape a new latch from 2.5 mm brass sheet and turned up and filed new eyes to match from 12 mm brass bar.  After soaking it in CRC I was able to remove most of the rust from inside the lock and file an old key I had spare to shape. Rather to my surprise, the lock now works effectively. I postponed work on the pockets and keepers inside the case until I had finished the rest of the restoration of the instrument. itself.

Figure 14: Finished exterior of case.

Figure 14: Finished exterior of case.

Ivory is no longer possible to obtain except from the keys of scrapped pianos and even those are for the most part ivorine, an early form of cellulose-based plastic. I had a few pieces from the scrapped scale of a distance meter and soon had let in a piece to form a new name scale, though for the time being it remains nameless. The ivorine doesn’t have the creamy texture of real ivory, but at least I am following the practice of many professional restorers of leaving the restored part obvious. The vernier scale was one or two orders more difficult. After working out the angular distance apart of the individual graduations I then had to set up the ivorine at the correct radius on the extended table of a rotary table. To cut the graduations so that they do not look amateurish I used a scribing device that I made many years ago and had not used since (Figure 15).

Figure 14: Scriber.

Figure 15: Scribing vernier.

The makeshift, rough version has, as is often usual with me, become the permanent version. A parallelogram mechanism keeps the scriber moving in the same plane under spring pressure and a disc with stops of different heights determines the lengths of the graduations. Figure 16 shows the partly finished scale.

Figure16: Radial lines scribed.

Figure 16: Radial lines scribed.

Once the radial lines were finished, the same scriber was used to mark out the remaining lines, together with guide lines for rough cutting out. The edges were then filed to shape and the underside bevelled to a knife-edge so that the edge of the scale came flush with the main scale (Figure 17). Usually, ivory vernier scales were secured to the index arm with two brass rivets, which caused staining and splitting as the rivets corroded and the ivory shrank. I simply glued the vernier scale into place with epoxy glue.

Figure 17: Completed vernier scale

Figure 17: Completed vernier scale

There was little to do to the remainder of the instrument except to clean the brass parts, repaint them where appropriate and to polish and lacquer the parts like screw heads that were usually left unpainted. While sextants and octants of this period often are shown bright and shiny, on several period instruments that I have handled, I have found traces of paint to guide me on what was usual. There are one or two points of design interest that may not be familiar to some readers. I will be covering the evolution of sighting devices in some detail in another post in the category Evolution of sextant parts, so will give only an outline here.

Figure 18 shows how the index mirror was set perpendicular to the frame. The mirror is held against three points on the front of the right-angled bracket by means of a clip or “keeper”. A central screw when tightened pulls the clip against the front of the mirror and holds the latter firmly against the three points on the front of the bracket. Two lateral fastening screws pass through clearance holes in the base into holes tapped in the index arm. A third screw, labelled “tilting screw” passes through a tapped hole in the base of the bracket so that when the fastening screws are slackened a little, the base can be tilted to the desired right angle be adjusting the tilting screw. This is not a very satisfactory method, as the heavy handed could (and did) bend the base or strip the thread of the screw or hole.

Figure 18 Index mirror adjustment.

Figure 18 Index mirror adjustment.

Figure 19 shows the pinhole which, at 2 mm in diameter, gives a very wide angle view, compared to that given by the Galilean telescope shown in Figure 20. The diameter of the objective lens of this telescope is a mere 18 mm with a magnification of 6 times. The field of view of a Galilean telescope depends on the diameter of the objective and inversely as the magnification, and in this telescope the field of view is only about 3.5 degrees. Because of this, if Captain James Cook’s practice is anything to go by, sailors used the telescope only when the sea was calm, as it was otherwise difficult to keep the body in view, due to the motion of the ship. The pinhole can be swung aside to allow the telescope to be screwed into the bracket. It can also be swung through 180 degrees so that the hole is offset away from the frame, to give a wider view of the horizon.

Figure 18: Pinhole.

Figure 19: Pinhole.


Figure 19: Telescope in place.

Figure 20: Telescope in place.

A coat of shellac brought back the frame to a pleasing finish and Figure 21 shows the completed instrument in its restored case, with pockets repaired and glued into place, and felts replaced.

Figure 21: Restoration complete.

Figure 21: Restoration complete.

Because of the shrinkage of the ivory main scale, this instrument is not of course a functional instrument any longer, but it is nevertheless an interesting representation of what the less prosperous sailing ship mariner might have used to find his latitude in the first half of the nineteenth century.

If you enjoyed reading this post, you might also enjoy my book The Nautical Sextant , available through amazon and good booksellers, and my book on the chronometer, The Mariner’s Chronometer, available only through amazon. The reviews on amazon will give you an idea what other purchasers thought of the books.


An Improvised Sun Compass

$
0
0

This post was preceded by  ” C Plath Sun Compass”; “A Fleuriais’ Marine Distance Meter” A Stuart Distance Meter”;“A Russian Naval Dip Meter”; and  “An Improvised Dip Meter”

In October, I described a C Plath sun compass in which a 24 hour clock is used to keep the alidade aligned with the sun. Recently, a friend in Australia sent me an old Astro-compass Mark II which someone had attempted to convert to a dumpy level, with only limited success. However, it gave me the opportunity to attempt to make a sun compass of my own along the lines of the Plath instrument, itself a modification of the Bumstead sun compass.

An essential requirement was a 24 hour clock. I had a Hamilton Master Navigational watch which has a 24 hour face, but I was not about to use that valuable instrument. What I did have was a quartz clock with a 24 hour face and, as it cost only a handful of dollars, I was happy to use that. However, I live in the southern hemisphere and as there was no room to mount it upside-down on the Mark II, it would have to run anticlockwise on the top. For those who might wish to copy me, let me say at the outset that reversing the battery will not cause the clock to go backwards. No doubt there is a diode somewhere in the circuit that prevents damaging reverse current from flowing. This led me to explore the mechanical insides of the clock. There is quite a lot of variation between makes, so I will not attempt to illustrate it, but all have an electronic circuit that delivers pulses every second to a tiny stepping motor whose rotor rotates through 180 degrees with each pulse. As it does so, it transmits movement to a gear chain that drives the hands in the correct relationship. There is a coil of fine wire wound around the armature of the stepping motor and I thought that I could simply reverse the polarity of the coil attachments to make the rotor go backwards. To save others quite a lot of difficult de-soldering and re-soldering trouble, let me say now that it does not work. The armature has two loose pieces that embrace the rotor and if the left is exchanged for the right (and vice-versa), this will  make the rotor and the clock go backwards. If you Google something like “How to make a clock run backwards” you will find several videos that show exactly how this is done.

So I had a 24 hour clock movement that ran backwards and now needed a face numbered in reverse. This is relatively easy to make using a drafting program such as TurboCAD and Figure 1 shows my result. Northern hemisphere readers who wish to make the compass will not of course have to go to the trouble of making the clock go backwards or of making the anti-clockwise dial.

Figure 1: 24 hour reversed dial.

Figure 1: 24 hour reversed dial.

It was then necessary to glue it to a suitable piece of sheet steel or brass, taking care to ensure that the central holes coincided exactly. I am happy to send a pdf file of the dial to anyone who might want to follow in my footsteps and who has no drafting program to draw such a dial. The dial is then fixed to the clock using two hexagonal nuts on the central pillar.

To allow easy removal of the movement to change the battery, I made a rectangular clip out of thin and springy sheet steel (Figure 2). Fixing the movement in its clip to the top of the compass will vary according to the maker. Sperti’s version has a smooth top and after removal of the alidade and its bracket, the clip could be glued with contact cement to a spacer glued in its turn to the top of the instrument, taking care to get things well centred with 00 hrs/12 hrs  correctly aligned fore and aft. The spacer is necessary so that the bottom of the clip clears the trunnions. My version was made by Henry Hughes and Son and had the round heads of three 6 B.A. screws projecting from the top, so I exchanged them for longer, countersunk head screws and used them to attach the clip via three spacers. Other improvisations may occur to readers.

The knob on the left in Figure 1 is used to adjust the longitude , using the “True bearing” scale and a little mental arithmetic. For example, I live at 173 degrees East longitude so the True Bearing scale will have to be set 7 degrees anti-clockwise. At 00 hours GMT, the sun will still have 7 degrees to go before it bears true north at local noon.

Figure 2: General arrangement from above left.

Figure 2: General arrangement from above left.

Attention now has to turn to the alidade. This could be simply a vertical bar arising from the end of an hour hand, or even simply a long hour hand bent up at a right angle so that its shadow falls on the face, passing through its centre. I chose to imitate a little the Plath arrangement as I had some Perspex (Lucite) available to cut drill and glue into shape, as shown in Figure 3. I trimmed a minute hand to length and bent it to clear the alidade.

Figure 3: Face of clock.

Figure 3: Face of clock.

Figure 4 shows the latitude setting knob and scales, set at my latitude of 35 degrees south. While the declination of the sun as I write is just under 23 1/2 degrees, there is enough length in the shadow bar to make it unnecessary to allow for this, though the original Mark II alidade had a separate declination scale to use with its sighting arrangements.

Figure 4: View of instrument from right and above.

Figure 4: View of instrument from right and above.

In use, the instrument is levelled , the clock is set to read GMT (or UTC which amounts practically to the same thing) and placed in its clip, 00 hours upwards, the latitude set and the longitude (after a little careful thought) allowed for on the True Heading scale. If the north on the compass scale is aligned with the lubber line and directed at true north, you should find that the shadow of the shadow bar passes right down the middle of the clock face and between the two lines scribed on the face of the screen. While the shadow remains aligned, the North point on the compass card will remain pointed at true north and any other desired course can be read off against the lubber’s line. The equation of time reaches a maximum of 16 1/2 minutes on November 5. This amounts to just over a degree in direction, so if you do not need direction to this precision, it can be ignored. Otherwise it has to be applied and the clock offset from GMT as outlined in the preceding post.

As an aside, I found that bringing out the instrument on its tripod was an excellent way of causing the sun to disappear behind clouds. It needed only for me to take it back inside to make the sun re-appear…


Restoring an Observator classic sextant

$
0
0

This post is preceded by one on “The Observator Mark 4 Sextant”.

I was recently asked if I would restore a sextant which had been given to Laura Dekker prior to her setting out from the Netherlands in August, 2010 to circumnavigate the world in a yacht. She had finally come to rest where she had been born, on her parents’ yacht, in the New Zealand city of Whangarei, some 200 km south east of my home in Pukenui. It was my pleasure to undertake the task and later to return the instrument to this remarkable young person. She describes her battles with the Dutch authorities, who refused to allow her to set out at the age of 14 years,  and her subsequent voyaging in her book: One Girl, One Dream (Harper Collins, 2014).

I had previously described the interesting Observator Mark IV sextant (April 2014). Laura’s instrument was plainly of an earlier era, probably from the 1950’s. Figure 1 shows the sextant as received. It bears no particular inscription, so I have chosen to call it the “Observator Classic”. The frame is of bronze and the whole sextant is exceptionally heavy at 2.32 kg (5 lbs 2 oz), compared to a Hughes and Son three ring micrometer sextant at about 1.5 kg and a W Ludolph sextant of similar robust build at 2.05 kg. It has a lighting system and as Figure 1 shows, corrosion had caused the lighting fixture to part company with its stem (All figures may be enlarged by clicking on them. Return to the text by using the back arrow.).

Figure 1: Sextant as received.

Figure 1: Sextant as received.

Figure 2 shows the condition of the rack and the entry to the battery compartment, complete with long-dead batteries. One can also see the exceptionally heavy ribbing of the frame, suggesting that it was perhaps a sand casting. Patient wire brushing restored the battery compartment to a conducting state while, once the stem of the lighting fixture had been persuaded away from the index arm fitting, it was the work of a few minutes to silver solder the stem back into place.

Figure 2: Rack and battery compartment.

Figure 2: Rack and battery compartment.

Figure 3 shows the structure of the micrometer worm and its shaft, perhaps somewhat over-engineered, but robust and adequate to purpose. The shaft has a taper on to which the worm is forced by a nut to ensure concentricity of the worm. At the other end of the shaft , a combined thimble and drum screws on to the shaft. It is located by a parallel register ahead of the threaded portion and secured in place by a locknut. The shaft rotates in two bearings in a bronze swing arm and axial preload is provided by a spring which is held in place by a cap that screws into the swing arm.

Figure 3: Micrometer exploded.

Figure 3: Micrometer exploded.

Figure 4 shows more detail of the micrometer mechanism. The cone ends of two screws, one each side of the swing arm engage with conical holes at each end of the arm and these screws are adjusted so that there is no end play but the arm can rock freely between the two screws, which are then locked. A leaf spring (not seen) between the swing arm and the lower end of the index arm holds the worm in engagement with the rack and the worm can be disengaged by squeezing the two together. Extensions of the trunions  that house the cone-ended screws act as keepers to prevent the lower end of the index arm from lifting off the frame and keep the worm aligned with the rack.

Figure 4: Detail of micrometer mechanism.

Figure 4: Detail of micrometer mechanism.

The telescope rising piece design lies somewhere between the more-or-less elaborate nineteenth and early twentieth century arrangements for adjusting the height of the telescope above the frame (see, e.g. http://sextantbook.com/?s=fine+C+Plath), and the very simple later vee and flat used by most makers after about 1950. The telescope rising piece is square and fits closely into a socket  screwed to the frame. A thumb screw locks it into position (Figure 5).

Figure 5: Telescope mounting.

Figure 5: Telescope mounting.

After cleaning up, making and replacing the mirrors, it remained only to repaint the instrument to give the pleasing result shown in Figure 6 and to clean up and re-varnish the case (Figure 7).

Observator 010

Figure 6: Finished instrument.


Figure 7: Restoration complete.

Figure 7: Restoration complete.


C Plath Yachting Sextant

$
0
0

This post was preceded by “Making a shades adjusting tool” and “Eighty years of Carl Plath Sextants”. Other posts on C Plath sextants may be found by entering “C Plath” in the search box on the right. All figures may be enlarged by clicking on them. Return to the text by using the back arrow.

Several makers, including C Plath, made sextants directed at the yachting market with more or less success. There seems to be a fair number of Freiberger yachting sextants around, but I have only ever seen two Plath Yachtsman sextants. In the years after WWII, many full-size sextants must have flooded the market, especially the USN Mark II sextant and those made by Henry Hughes and Son. The latter also made half size sextants for use in sea planes and presumably they were attractive to yachtsmen, as some have survived. A variety of plastic sextants derived from the Maritime Commission version for lifeboats came on to the market and evolved into instruments that looked like “proper”metal sextants, though few were rigid enough to behave like one. Francis Barker produced a box sextant labelled “Small Craft Precision Sextant” intended for sale to yachtsmen, but despite having been provided with a horizon shade and an eyepiece shade in addition to the usual index shade, I doubt that it found much favour with nautical users. A box sextant is a fiddly instrument at the best of times and it is difficult enough to take sights from a rolling yacht. Ilon industries made an ingenious little micrometer sextant provided with a tiny prismatic monocular (http://sextantbook.com/category/ilon-industries-sextant/) that may have found favour with the well-heeled and Tamaya made a light weight 5/6ths sized micrometer sextant. The French firm of Roger Poulin made an interesting little sextant that was plainly aimed at the yachting market and I have described it here: http://sextantbook.com/?s=Poulin .

It is not clear whether the yachtsman wished a smaller sextant because of lack of space aboard yachts or because a smaller sextant might be cheaper than a full-sized version. At any rate the saving in space and weight must have been insignificant, and the savings made by buying a smaller sextant cannot have been great when compared with the cost of the vessel.

Unlike the Freiberger Yacht Sextant (http://sextantbook.com/?s=Freiberger+yacht), which attempts in a way to echo the full sized instrument, the frame of the C Plath sextant is monolithic and exceptionally rigid. Figure 1 shows a general view of the front. The bases of the index and horizon mirror brackets are identical though the horizon mirror itself is half silvered. Both are circular, presumably because it is easier to seal the mirrors against the intrusion of salt water behind them, but as can be seen in some of the later figures, the index mirror has suffered around the edges. The two index shades and one horizon shade are adequate in most circumstances. Their brackets are simple and no provision is made for adjustment of friction. A notch in the edge of the frame allows the horizon shade to be folded completely out of the line of sight.

The rack in which the micrometer worm engages in machined into the edge of the limb, together with a slot for a keeper to keep correct engagement. The radius of the rack is about 140 mm (5.5 ins) and the instrument weighs 1260G (2lbs 12 oz).

Figure 1: General view of front.

Figure 1: General view of front.

The telescope has a simple draw tube for focusing, and  has an aperture of 25 mm and a power of about 2.5 diameters, giving a field of view of a little over 6 degrees. This is about the same as one gets from a 4 x 40 mm telescope of a full-sized instrument. Though a C Plath leaflet says the aperture is 30 mm with a magnification of x 4, the inside diameter of the tube in front of the objective lens of my sextant is only 27.5 mm and it has to sit on a shoulder, so the aperture behind the lens is only 25.1 mm. The measured magnification is about x 2.5.

The telescope is not demountable, a disadvantage on a small vessel when it is rolling and pitching, as with a standard field of view it can be difficult to acquire the heavenly body and bring it down to the horizon. Removing the telescope altogether makes it much easier to find the body and to bring it down, when the telescope can be replaced and the horizon swept to re-acquire the body. However, the telescope mounting is very robust so that it is not only resistant to knocks, but the sextant can safely be picked up by the telescope without fear of damaging or displacing it. The micrometer mechanism is well protected against knocks and the release catch is simple to operate. Figure 2 shows a rear view of the instrument.

Figure 2: Back view.

Figure 2: Back view.

The frame is closed off at the back by a back plate, which is attached to the frame by three screws and a leg. The handle, adapted from a full-sized instrument battery handle, is attached to the back plate via pillars by two countersunk screws. Removing the back plate reveals the index arm as shown in Figure 3. Note that if the sextant gets drenched in salt water, it is an easy matter to rinse out the interior with fresh water without necessarily removing the back plate.

Figure 3:  Rear view without back plate.

Figure 3: Rear view without back plate.

The index arm is in two pieces: a stout rectangular bar attached to the index mirror bearing at the top; and  a plate that I have christened the index arm expansion at the bottom. This plate carries the micrometer mechanism. I have labelled the screw for attaching the horizon mirror and the swing arm keeper in Figure 3 for future reference below. Also seen are the two stout screws that attach the telescope to the frame.

Figure 3: Index arm bearing.

Figure 4: Index arm bearing.

The anatomy of the index arm bearing is revealed in Figure 4. A micro-finished journal runs in a parallel bearing machined directly into the frame, with two PTFE washers acting as spacers and also taking any minor thrust forces that may arise. A flange above the journal carries the index mirror in its bracket, while a spigot below attaches the index arm. Figure 5 shows how the upper end of the index arm is split, with a pinch screw to close it around the spigot. This allows adjustment of the mirror in the horizontal plane as well as axial adjustment to take up any axial movement in the bearing.

Figure 5: Upper end of index arm.

Figure 5: Upper end of index arm.

Figure 6 shows how the index mirror is adjusted for perpendicularity and the horizon mirror for side error (the horizon mirror is illustrated) . The mirror bracket is rocked by means of two screws about two ball bearings sitting is depressions to form an axis of rotation.

Figure 6: Mirror bracket adjustment.

Figure 6: Mirror bracket adjustment.

As the reflective surface of the index mirror lies a little ahead of the axis of rotation of the index mirror it is necessary to use two vanes to raise the line of sight to somewhere near the centre of the mirror, as otherwise a minor error in perpendicularity may be introduced. Figure 7 shows how two small dominoes have been used, but any two identical objects objects of about the right height may be used, such as pieces cut from aluminium or steel angle, large hexagonal nuts or large rollers from a scrapped roller bearing. One is placed on the limb of the sextant at zero and the other at about 90 degrees. The index arm is then rotated until a reflected view of the second vane is seen alongside a direct view of the first, when the mirror is adjusted to bring their tops into line as shown. In many sextants, including this one, it may be necessary to remove the telescope and/or index shades to obtain the required view.

Figure 7: Adjusting index mirror for perpendicularity.

Figure 7: Adjusting index mirror for perpendicularity.

When adjusting the horizon mirror to remove index error, the screw arrowed in Figure 3 is slackened and a tommy bar used in the hole visible on the right in Figure 7 to rotate the whole base. This is a relatively coarse way of adjusting and may involve much trial and error, but once done, the whole set-up is rigid and not likely to drift out of adjustment in a way that is so annoying with plastic “instruments”.  Removing side error has already been mentioned in the paragraph following Figure 5. Note that index error cannot be removed by using the sun, as the single horizon shade is not dense enough for this method. There is no adjustment available for collimating the telescope, but quite large errors of collimation have relatively little effect on the accuracy of readings, especially for the class of sight likely to be made with this instrument. In any case, this is taken care of at manufacture and would require very rough handling indeed to disturb.

The micrometer mechanism is robust and well-protected. Figure 8 shows it detached from the index arm. The black release catch on the right in fact remains stationary when disengaging the worm and it is the horn extending down and to the left  on the plate that rotates when it and the black catch are squeezed together.

Figure : Micrometer mechanism detached from index arm.

Figure 8: Micrometer mechanism detached from index arm.

In Figure 9, the front plate which carries the fiducial lines for the degrees scale and the micrometer has been removed to show the swing arm chassis. This carries the micrometer worm in a plain parallel bearing, the axial play of which is taken up by a leaf spring. A swing arm extends upwards and to the right to a bearing in the form of a shouldered screw, about which the chassis rotates. A stout helical spring keeps the worm in engagement with the rack machined on the edge of the limb of the sextant.

Figure : Front plate removed to show interior of micrometer mechanism.

Figure 9: Front plate removed to show interior of micrometer mechanism.

Figure 10 shows these parts more clearly. In addition, there is a rectangular keeper that guides the index arm expansion and keeps the worm in correct engagement. It slides in a slot machined in the limb below the rack.

Figure : Micrometer mechanism exploded.

Figure 10: Micrometer mechanism exploded.

A further, circular, keeper ensures that the swing arm chassis cannot lift off the face of the index arm expansion. The spigot on the keeper slides in the oval slot and the keeper is retained in the chassis by means of a screw whose tapped hole is shown in Figure 11, centre, which illustrates the bearing surfaces for the swing arm chassis. The keeper can be seen in place in Figure 3, above.

Figure : Swing arm bearings.

Figure 11: Swing arm bearings.

The sextant frame, being made of aluminium alloy, is inherently resistant to corrosion, but parts that do not run together have a tough coating of blue paint. Other parts are made of bronze and all the screws and springs are of stainless steel. If the sextant should receive a soaking, it is a simple matter to rinse it with fresh water and allow it to dry, as all the parts of the interior are accessible. Nevertheless, at overhaul it would be wise to use waterproof marine grease  for all moving parts except for the rack, which should receive SAE 30 lubricating oil, brushed into the rack with surplus being brushed and wiped off.

The case provided was, like so many other sextant cases over the last fifty years, made of plywood. Quite why the makers did not usually specify marine grade ply is a mystery, as many of them, including those from C Plath, suffered from delamination if stored damp. It was stored face down in the case, leaving the handle ready for use, but as it cannot be set down on a table face down, this is a limited advantage. Perhaps though, it was to discourage users from leaving it in a position on a table to slide onto the floor. The general rule is that a sextant should be in the user’s hand or in its case, relatively easy to follow on a yacht, but more difficult on the bridge of a large ship. All in all, this is a robust sextant, well suited to its task.

Dr Andreas Philipp writes that at least 900 of these sextants were made from 1968, starting with a serial number of 101. They were sold mainly in the USA.


A turn-of-the-century French Sextant

$
0
0

Previous posts in this category include: “A Half-size Sextant by Lefebvre-Poulin”, ” A Fine Sextant by Spencer, Browning and Co”,  “A C19 Sextant Restoration” , “Making a Keystone Sextant Case” , “Restoring a C. Plath Drei Kreis Sextant” , “Heath Curve-bar sextant compared with Plath” , “A Drowned Husun Three Circle Sextant”, ”Troughton and Simms Surveying Sextant” , “A Sextant 210 Years On” , “A fine sextant by Filotecnica Salmoiraghi”, “A British Admiralty Vernier Sextant”, “An Hungarian Sextant via Bulgaria” ,  “A Half-size Sextant by Hughes and Son” and “A Fine C Plath Vernier Sextant”, “Heath and Co’s Best Vernier Sextant.” and “An Early C19 Ebony Quadrant Restored”.

Figures may be enlarged by right clicking on them. Return to the text by using the back arrow.

A rather dusty and neglected little French sextant came into my hands a few weeks ago. The kinship of French sextants is quite difficult to sort out. This one bore a label in which the name of A Hurlimann is given prominence and the names of his successors, Ponthus and Therode, are given less prominence (Figure 1). The limb is engraved in copperplate Lorieux, A Hurlimann, succr (successor) à Paris.

Figure 1 : Label in lid of case.

Figure 1 : Label in lid of case.

A. Hurlimann succeeded a distinguished line of French instrument makers. Two pupils of the renowned Henri Gambey founded a firm in 1845. Possibly both originally named Schwartz (Black), they were known as Lenoir (Black) and Lorieux, and managed by Lorieux and then Hurlimann. In 1900 they were succeeded by Ponthus and Therode. At the turn of the century in about 1902 the firm moved from 43, Passage Dauphine, Paris, to 6 rue Victor Considerant. It was then taken over by Albert Lepetit , possibly in 1914, and moved to Montrouge at 204 avenue Marx Dormoy, eventually passing into the hands of Roger Poulin in about 1950. Thus, I surmise that the sextant dates from between 1902 and 1914.

Figure 2 shows the instrument in its case as received. There is a large shrinkage crack in the lid and floor. Not clearly visible are a Keplerian telescope of about 6 power in a pocket at the front of the case and a screwdriver at the back. The label in the lid counsels against using alcohol to clean the instrument, suggesting that it is painted with a shellac-based lacquer (which dissolves in alcohol).

Figure 2: Sextant as received.

Figure 2: Sextant as received.

The frame is a bronze casting with inlaid silver arc, beautifully finished and otherwise unremarkable except for its relatively small radius for the time, of only 142 mm.  The arc is divided to 20 minutes and the vernier reads to a realistic 30 seconds. The divisions are crisp and the numerals are hand engraved in italics. A more usual radius for vernier sextants is about 180 mm and many of these instruments have verniers divided to 10 seconds, though it is usually quite impossible in these cases to say with certainty which pair of lines coincide.

There are two main areas of interest in the design: a) the mirror adjustments are complicated, compared to what we may think of as the modern method of springs on the front of the mirrors opposing the action of screws behind the mirror (in fact this dates from the 18th century and was invented by John Dolland); and b) the mode of mounting of the tangent screw, which seems to have had a German influence, as it is also seen in vernier sextants made by Frederick Ernest Brandis, a German immigrant to the New York in 1858.

The index mirror is held against the upright of a bracket by means of a clamp whose clamping screw bears against the back of the upright as shown in Figure 3 and Figure 4.

Figure 3: Front of index mirror clamp.

Figure 3: Front of index mirror clamp.

Figure 4: Index mirror in place.

Figure 4: Index mirror in place.

The mirror is adjusted for perpendicularity by rocking the whole bracket on the two radiused front feet by means of an adjusting  screw held captive in the horizontal part of the bracket and engaging with a threaded hole in the top of the index arm (Figure 5). The screw can be locked by tightening the screws that pass through the brass clamp bar that holds the screw captive. An earlier (and simpler) method was to have the hole in the foot tapped for a screw, the end of which simply bore on the face of the index arm, though there was a tendency for the thread to strip in clumsy hands.

Figure:

Figure 5: Index mirror bracket with screw in place.

The horizon mirror adjustment system is even more complex. A large cylindrical boss on the underside of the bracket (Figure 6) passes through a hole in the sextant frame and is secured by a large brass locking screw and washer (Figure 7). A screw held captive in the frame enters the threaded hole in the tongue and rotates the mirror to correct for index error (Figure 8). This movement is locked by means of the knurled clamp screw behind the frame, seen in Figures 7 and  8.

Figure 7: Horizon mirror bracket and clamp.

Figure 6: Horizon mirror bracket and clamp.

Figure 8: Horizon mirror locking screws.

Figure 7: Horizon mirror locking screws.

Side error is taken care of by a similar captive screw that opens or closes the slot in the base of the bracket, as seen in Figure 6 and 8. These adjustments are easy to use and effective, but are at the expense of a good deal of complication.

Figure 9: General view of horizon mirror adjustments.

Figure 8: General view of horizon mirror adjustments.

The telescope mounting again achieves a good result at the expense of complexity (Figure 9). The rising piece is triangular in  section and is close-fitting in a triangular hole in a bracket that passes through a hole in the telescope frame and which is secured by a large knurled nut. A countersunk screw passes through the frame into the bracket to secure it against rotation. A large knurled adjusting thumb screw is held captive in the bracket and its thread passes up the middle of the rising piece to make it rise or fall.

Figure 9:mounting of telescope rising piece.

Figure 9: Mounting of telescope rising piece.

Figure 10 shows the mounting exploded.

Figure 10: Exploded view of telescope mounting.

Figure 10: Exploded view of telescope mounting.

The tangent screw  follows F E Brandis’ practice quite closely (or vice-versa). It has a knurled knob on each end and runs in a spherical bearing at the front end. The threaded part passes through a spherical nut which is held captive in the sliding block by a cap and prevented from rotating by the slender boss on its underside, that passes into a hole in the spherical seat on the face of the sliding block (Figure 11).

Figure 11: General view of tangent screw mechanism.

Figure 11: General view of tangent screw mechanism.

Figure 11 shows the tangent screw bearing exploded and it can also be seen that the nut cap is a similar device to the bearing cap.

Figure 12: Tangent screw bearing.

Figure 12: Tangent screw bearing.

The sliding block is held in the rectangular window cut into the expanded part of the index arm by a leaf spring and a clamp spring. When the clamp is tightened, the block can no longer slide over the limb, so that when the tangent screw is rotated it is the index arm that moves. Thus, although I have named the part the sliding block (since no one else seems to have troubled to give it a name) in truth it is the index arm expansion that does the sliding.

Figure 13: Underside of sliding block

Figure 13: Underside of sliding block and clamp.

The shades mountings are unremarkable in design (see Figure 7) except that they have no provision for isolating the movement of one shade from the next by means of, for example, keyed separating washers. Friction is provided by Belleville washers, patented in 1867 by Julien Belleville, a Frenchman.

The telescope kit comprises the usual “zero magnification” sighting tube, a 3 x 26 mm Galilean “star” and a 6 x 15 Keplerian or “inverting” telescope (Figure 14), supplemented by two eyepiece shades of more or less equal density though of slightly different colours (neutral and deep orange).

Figure 14: Sighting devices.

Figure 14: Sighting devices.

The case (Figure 15) is of a light coloured wood with a grain similar to that of mahogany, with dovetailed corners, and both top and bottom were glued and nailed on with steel pins. I find it strange that a few francs were saved by using steel instead of brass pins or, better, brass screws, given that the whole instrument probably cost several months salary for a merchant officer of the time. On the other hand, the brass handle seems on the heavy side for the neat little case into which all the parts fit snugly, perhaps too snugly, and the instrument is held in a pair of felt-lined pockets by a pillar in the lid which passes through the frame and sits on the sextant handle (Figure 2, above). The latter is of the traditional pear shape. The hinges and hooks are of brass and there is a brass lock with ebony escutcheon.

Figure 14: Case exterior.

Figure 15: Case exterior.

It was possible to remove both top and bottom for re-gluing and the crack in the bottom was simply closed up, leaving a minor cosmetic deficit at the back of the case. The crack in the top was much wider and I dealt with it after re-gluing and nailing by filling it with epoxy cement and adding a layer of coloured filler above and below. It was not possible to save the label with its cleaning advice and I replaced it by a modern one using a matching typeface and lay out. Figure 16 shows the final result of the restoration of sextant and case.

Figure 17: Restored instrument in its case.

Figure 16: Restored instrument and case.

Post script: Come to think of it, the card pasted inside the lid, suggests a time of sale after 1902, but the inscription on the limb of the sextant itself suggests that it was made before the Pontus and Therode take-over.


A Francis Barker Yachting Sextant.

$
0
0

This post also appears under the category “Box sextants”. All figures may enlarged by clicking on them. Use the back arrow to return to the text. 

Francis Barker, born in 1819, flourished in Clerkenwell Road, London from about 1840 until his death from tuberculosis in 1875. He was succeeded by his sons and the firm continued under his name until about 1932, when it was taken over, eventually by Pyser CGI of Edenbridge, Kent. Barker’s main products were magnetic compasses and sundials, though they did branch out into jewellery making in the late nineteenth century. Magnetic marching compasses continue to be made under the Francis Barker name. Probably in the second half of the 1970s they began to produce a yachting sextant and production probably continued for about ten years. Celestaire bought the entire remaining stock of 36 instruments in the late 1980s and disposed of all of them. They are relatively rare.

The sextant was a box or drum sextant and was contained in a heavy saddle leather case, retained by two press studs (Figure 1). It is quite difficult to extract it from its case without pulling on the strap and putting its stitching at risk. The small handbook reommends putting the strap around the user’s neck to guard against accidentally dropping it overboard.

In case

Figure 1. Sextant in its case.

Figure 2 shows the instrument out of its case, and Figure 3 shows the general arrangement with the principal parts labelled.

OLYMPUS DIGITAL CAMERA

Figure 2: Sextant out of its case.

GA

Figure 3: General arrangement.

The operating parts are contained within a light alloy drum 76 mm in diameter and 50 mm high. The main scale, 45 mm in radius, is divided to half degrees, and there is a vernier divided to single minutes. The setting knob contains a planetry drive, which gives a slow motion when rotated slowly and a fast motion when rotated more quickly.

There are two interchangeable peep sights (Figure 4), each with a 1.5 mm in diameter hole. One is provided with a shade for use when the horizon is bright. Many older users may have small central cataracts in their eyes and they may find that the hole in the sight is small enough to cause a shadow of their cataracts to partially obscure their view, in which case there is nothing to be lost by opening out the hole to, say, 2 mm, to allow more peripheral rays to by-pass the cataract. The two levers shown bring index shades into the light path.

GA with sights

Figure 4: Peep sights and shades.

The internal arrangement for these shades is shown in Figure 5. According to Ken Gebhart of Celestaire, there are at least 18 units in ciculation in which full glasses were installed by mistake, instead of the half-glasses shown.

Shades

Figure 5: Horizon shades.

Figure 6 shows the general internal arrangement.

GA internal

Figure 6; General internal arrangement.

The index mirror is adjusted for perpendicularity by the usual method (Figure 7) and Figure 8 shows how the mirror bracket is tilted by means of opposed screws which rock it about a horizontal axis formed by the heads of two grub screws.

Perp adjust

Figure 7: Aligning index mirror for perpendicularity.

Index mirror mount

Figure 8: Index mirror mounting and adjustments.

The method of adjusting the horizon mirror for index error can be seen reflected in the index mirror in Figure 7 and a close up is shown in Figure 9. Side error is taken care of by the same method of rocking about an axis by two opposed screws , while index error is removed by rotating the whole mirror bracket via a metal gear meshing with a nylon gear.

Horizon mirror adj

Figure 9: Horizon mirror adjustments.

The squared heads of the adjusting screws are on the face of the sextant and are adjusted by means of a key that unscrews from its nearby housing (Figure 10). The slotted screw must be tightened before removing side error and then slackened off a little to allow adjustment for index error. This may introduce some more side error, so the cycle may need to be repeated a few times, after which the slotted screw is carefully re-tightened.

Adjusting screws

Figure 10: Heads of adjusting screws

The scales are read with the help of a plano-convex lens of about 25 mm focal length (Figure 11). The divisions lack a little of the crispness seen in earlier box sextants. The rather small radius of the arc, of 45 mm as opposed to about 160 mm for a full size vernier sextant, makes deciding which line on the vernier coincides with a line on the main scale somewhat problematical. In the photograph, which gives a fair representation of what is actually seen, at least three lines coincide, so perhaps the best that can be done is to decide which two pairs just do not coincide and to chose the lines midway between the two pairs.

Scales

Figure 1. Sextant in its case.


If you enjoyed reading this post, you may also enjoy my books “The Nautical Sextant” and “The Mariner’s Chronometer” (www.chronometerbook.com).


.


A Coutinho-Pattern Bubble Sextant

$
0
0

All Figures may be enlarged by clicking on them. Return to the post by using the back arrow at top left.

Brief history

In 1922, Gago Coutinho, a Portugese naval aviator and inventor, was the first to fly the Atlantic, from Lisbon to Rio de Janeiro via the Las Palmas and Fernando Norohna using celestial navigation. According to A J Hughes, he descended to low levels to use the natural horizon and it is not clear whether he used an artificial horizon instrument of his own design, adapted from one by C Plath, but at any rate, he took such an instrument with him. As Figure 1 shows, this historic instrument was a vernier sextant fitted with an artificial horizon in the form of a longitudinal level vial and with scale illumination

Early sextant

Figure 1: Admiral Coutinho using his early bubble sextant.

With the cooperation of C Plath, the sextant was further developed at the request of the Portugeuse Navy and by 1927  had reached the final form which is often illustrated in histories of air navigation. Captain Wittenman navigated the Graf Zeppelin around the world in 1929 using such a sextant.The sextant was shown at the 1930 Berlin Airshow and was apparently popular with airlines in the 1930s.  It is said that  Henry Hughes and Son were also asked to develop the design but showed little interest. Their gifted chief designer, P F Everitt was developing Hughes’s own sextant, which evolved into the versatile Mark IX bubble sextant series. During the Second World War, the Japanese navy used a version of the fully developed sextant. Whether it was simply an exact copy of the Plath version by Tamaya, with better developed scale lighting, or whether it was in fact a Plath instrument with Japanese markings will probably never be known, but the Japanese certainly had a highly developed engineering and instrument industry, as many Western engineering firms and  instrument makers learned to their cost after the war.

General

A little while ago, I acquired such a copy, shown in its case in Figure 2 and, with its accessories, out of the case in Figure 3. It appears to be the fifth in a group of five and has naval markings.

2 In case

Figure 2: Coutinho pattern sextant in its case.

3 GA labelled

Figure 3: Contents of case.

The sextant differs from C Plath’s standard ladder pattern micrometer sextant in several aspects. The most obvious is the artificial horizon, and to accommodate this and also allow its use with the natural horizon, the index mirror is unusually tall (see Figure 8). The frame is of aluminium alloy, something that Tamaya in particular developed post-war when combined with a bronze rack, and the scale reads from – 15 degrees to 105 degrees. There was obviously no need for the scale to read beyond 90 degrees and it is possible that the unusually wide negative range of -15 degrees was intended to be used to determine the distance off known objects from the air, provided that the height of the aircraft was known. The design of the artificial horizon requires a special telescope in addition to a standard telescope; and two peep sights are also provided. Tamaya was probably the first to use a perspex light guide to illuminate the main scales and provision also had to be made to light the artificial horizon.

The artificial horizon system

Figure 4 shows the horizon mirror. Rays from the over-size index mirror are reflected off the silvered portion into the eye via a telescope or peep sight, while the natural horizon may be viewed in the usual way through the clear portion, using shades if necessary. When using the artificial horizon, the shades are all folded over to obscure the clear glass.

Horizon mirror face

Figure 4: Face of horizon mirror.

In use, the longitudinal spirit level is viewed through the upright of the T-shaped gap in the silvering by reflection off a mirror and the tilt level vial is viewed directly via the cross piece of the gap to ensure that the frame of the sextant is vertical (Figure 5).

5 Inside AH

Figure 5: General arrangement of interior of artificial horizon.

The longitudinal vial is illuminated from below through a slot in the casing, using a white diffuse reflector by day and a bulb let into the frame by night. The tilt level  seems to have been left to take its chances, as it is a little hard to discern by day and more so by night.The purpose of the blank shade whose axis is seen directly above the reflector is unclear. It was probably intended to reduce stray light at night from the bulb.

Figure 6 shows the tilt or cross vial in more detail.. It also shows the counter spring for the index error adjustment which must necessarily be made from the front of the mirror rather  than, more usually, the back.

6 b

Figure 6: Detail of cross vial.

7 AH from below

Figure 7: Artificial horizon from below.

A spare cross vial and two longitudinal vials in their carriers were provided and this enabled me to check an essential requirement of a bubble sextant: that once the bubble and the image of the observed body are brought into coincidence, they move together when the sextant is tilted fore and aft. For this to happen in most bubble sextants, the bubble is at the focus of a collimating lens, so that an image of the bubble appears at infinity when combined with a view of the object in a beam splitter. The  radius of curvature of the vial must be the same as the focal length of the collimating lens. In the Coutinho sextant, that translates into saying that the working distance of the lens that sees the bubble and the radius of the vial must be the same.

9 Spare vials 2

Figure 8: Kit of spare vials.

In 2001, when I was investigating how to grind sensitive spirit level vials, I made a version of the National Physical Laboratory small angle generator (described in On the Level. Model Engineers’ Workshop, October 2001). With it, I measured the sensitivity of a vial and found that the bubble moved 5 mm for a change in angle of 0.024 radians (1.389 °). Thus the radius of the interior of the vial is 5/0.024 ≅ 208 mm, and this corresponds roughly with the distance between the objective lens and the vial via the mirror, given that it is not possible easily to determine where in the lens system to measure from (see below).

Figure 9 shows the unusually large index mirror with the horizon mirror reflected in it.It is about 45 mm square, so that the mirror is tall enough for the instrument to be used with both artificial and natural horizon. C Plath and Japanese sextants that followed their practice were using large mirrors and objective lenses at a time when British, French and American sextants lagged well behind. To make an extreme comparison, the war-time standard C Plath sextant had an index mirror 56 x 42 mm (2352 mm²), a horizon mirror 55 mm in diameter with a silvered area of 2375 mm² and a telescope objective diameter of 40 mm (1256 mm²), while the Mark II US navy sextant had an index mirror 40 mm square (1600 mm²), a rectangular horizon mirror with a silvered area of 325 mm² and a telescope objective of only 18 mm diameter (255 mm²).

10 Index mirror

Figure 9: Index and horizon mirrors.

Telescopes and sights

Three sighting devices were provided: a standard 3 x 30 mm Galilean or star telescope with an extra long rising piece to bring it in range of the clear part of the horizon mirror; a 2 x 34 mm telescope for use with the artificial horizon (AH) ; and a peep sight with interchangeable sights, one a simple 1 mm vertical slit and the other a 1 mm slit expanding to a round 4 mm hole at one end, for use with the artificial horizon. I will describe only the two latter.

Figure 10 shows the general arrangement of the AH telescope.The body is a heavy brass turning held in a stout brass rising piece. Focusing is done by rotating  a knurled ring with a threaded peg which engages in a spiral slot cut into the wall of the eyepiece tube. The 12 mm diameter negative eye lens has a power of -21.25 dioptres or 47 mm, so we may take the focal length of the main objective lens to be about +95 mm (10.5D).

Scope sife view 001

Figure 10: Telescope for use with artificial horizon.

The objective lens  is combined with an auxiliary lens, selected so that when an object at infinity is viewed, the longitudinal bubble of the level is also in focus (Figure 11). As the combination has a focal length of about +70 mm (14D), we may deduce that the focal length of the auxiliary lens is about +280 mm (3.6D).

11 Objective

Figure 11 : Bubble sextant objective lens.

Figure 12 shows the objective lens exploded. A slice of auxiliary lens is cemented to a plane parallel glass and its convex side faces the convex side of the main objective lens, separated by a spacer ring. The whole combination is held in the body with a threaded retaining ring. At about the same time as this type of bubble sextant was conceived, Richard E Byrd, then a Lieutenant Commander in the US Navy, had constructed for him a sextant on the same principle, in which an auxiliary half lens allowed a single longitudinal vial to be viewed. There was no tilt vial. See my posts for 30 May, 2009 and 11 August 2009 for details of this sextant.

12 Objective exploded

Figure 12 : Objective lens dissected.

When the objective lens of a Galilean telescope is, say, half covered, that half of the image disappears, whereas with a Keplerian telescope, the whole image remains but is of half the intensity. Thus, with this special telescope it is difficult to superimpose the image of the observed object upon the bubble (since the auxiliary lens places it well out of focus); it can however be placed alongside. By careful choice of the index shades and by moving the eye to one side of the field of view, it is possible to superimpose the images, presumably utilising reflection off the front face of the unsilvered “T”, but I cannot imagine that this would be easy in an aircraft A corollary of this is that the bubble of the tilt level is not quite in focus, being nearer to the objective that the other bubble. It is also poorly lit and on the extreme outside of the field of view, even out of view altogether for spectacle-wearers. I imagine that it would need considerable practice to get the two levels and the image of the observed body in the right places together. On land, I can achieve only fleeting coincidences with the sun. I will report later on star observations.

Withe the peep sights (Figure 13) matters are easier, as the slot increases the depth of field and everything is more or less in focus, while the image of the sun and the bubble are about the same size. The two apertures are not, I surmise, intended to be used together, since only a view of the vial would be obtained. Rather, they are interchangeable and orientation is assured by a pin engaging in a vee-shaped slot.

13 Peep sights side

Figure 13: Peep sights in holder.

There seems little point to having the aperture with the round hole (Figure 14) since  a perfectly adequate view of the cross vial is had without it.

15 a Combined peep

Figure 14: Peep sight apertures.

Lighting system

Tamaya was probably the first to use a perspex light guide to carry light from a bulb to the scales of a sextant (Figure 15). The substantial black plastic handle contains a 1.5 volt “C”cell that provides current via a simple push button switch to the bulb (Figure 16). Earth return is via the body of the sextant and a special potentiometer in the bottom of the handle.

16 Scale lighting

Figure 15: Scale lighting.

Figure 16 shows the interior of the battery handle and some of the wiring. Note that the switch controls lighting to both the scales and the level unit. though both are not illuminated at once. Instead, the special potentiometer controls the intensity of the light to each in turn.

Lighting system 001

Figure 16: Battery handle.

At the front or left-hand end of the limb is a hole to accept the holder for the bulb that lights the level unit. The blank shade, the knob for which is visible at bottom left of Figure 16 is rotated upwards to prevent stray light from shining upwards and light from the lamp can then reach the white reflector and be diverted into the unit. In fact, relatively little light finds its way inside and in full darkness it is rather hard to make out the cross level bubble.

Lighting system 002

Figure 17: Level lighting.

The exterior of the potentiometer is shown in Figure 18, together with the socket for external power and Figure 19 shows the internal construction of the device.

19 Pot exterior

Figure 18: Potentiometer knob and power socket.

There are two separate resistance windings with a wiper inside the knob being common to both and the knob carries current from the battery via the central screw and metal cap. Each bulb may be switched on and its intensity controlled in turn, but not together, and the battery handle switch must be depressed for either to light.

18 Pot

Figure 19: Interior of potentiometer.


According to Freidrich Jerchow’s history of C Plath, From Sextant to Satellite Navigation, the sextant enjoyed some popularity in its fully developed form in the 1930s at a time when airships were seen as the long-distance aircraft of the future. It was probably quite suited for use in airships, which are notably stable and little subject to the effects of air turbulence, but as airships fell into disuse, so the sextant was overtaken by the development of other bubble sextants, all of which had circular levels and all of which directed an image of the bubble, apparently at infinity, into the light path via beam splitters. The particular sextant which I have described, however, has a placard indicating that it was made, or at least, sold,  in the ninth month of the nineteenth year of the Showa dynasty (Figure 20)  or September 1944, by Tamaya. The stamps each side of the serial number are naval marks. Compared to copies of the A8-A bubble sextant, which were also made in Japan, this would have been an obsolescent instrument and much more difficult to use in a fixed wing aircraft.

2962 008

Figure 20: Maker’s placard.

For completeness, I show the outside of the case in Figure 21. The furniture is brass with a heavy canvas handle in good condition. The interesting slanting comb corner joints seem to combine the advantages of dovetails with the large glued area of ordinary comb corner joints. Both top and bottom are attached with brass screws and the catch is supplemented by hook latches. I am unable to identify the wood.

1 Case exterior

Figure 21: Exterior of case.

I hope you have enjoyed reading about this rare and unusual sextant. You may also enjoy reading my books The Nautical Sextant and The Mariner’s Chronometer.


Mending broken legs

$
0
0

One of the commoner parts to be broken when sextants are dropped or break loose from their moorings in the case is a leg. Legs are often rather long and slender with a correspondingly small diameter to the screw thread that attaches them to the frame. A typical thread outside diameter would be 4 mm and the core diameter of an M4 thread is a mere 3.3 mm. Usually, the threaded part breaks off, leaving a short stub behind on the leg. This post is mainly about extracting the threaded part from the frame.

Extracting large threads is relatively easy. One just drills a hole approximately down the middle and inserts an “Easy-out”, a hardened tapered tool with a coarse left hand thread cut on it. As it is screwed into the hole (left handed of course) it eventually jams and continued rotation extracts the broken stub. However, the threads used on sextant legs are too small for this to be an option, and more care is needed. Figure 1 shows the starting point, as found in an antique Observator sextant. The thread is M4, with a tapping size of 3.3 mm.

leg-1

Figure 1: Broken leg as found

Two centre punches are needed, one with a sharp point with an included angle of about 40 degrees, sometimes called a prick punch, and another with a greater included angle, approaching about 90 degrees. Both need to be sharp. Using a strong hand lens the centre of the stub is located (Figure 2) with the prick punch and very light pressure applied, just enough to make a tiny depression.

leg-mend-1

Figure 2: Marking the centre.

This is checked for centering and if it appears to be off-centre, it is coaxed in the right direction by applying light sideways pressure and then uprighting the punch to apply a little more. If satisfactory, the prick punch is given a light tap to deepen the punch mark. [As an historical aside, this method of “coaxing” marks into their correct position was used by Jesse Ramsden when originating his dividing machines some time before 1777.]

This fine punch mark is then deepened and widened with the other punch (Figure 3), carefully exploring with the tip until you are certain that it is located correctly in the fine mark. Give a light tap at first and then check you are in the right place. Follow up with a heavier tap.

leg-mend-3

Figure 3: Enlarging the centre punch mark

This larger punch mark now guides a drill, starting with a small diameter (Figure 4). About 1 mm seems to be about the correct size, so that the drill point is guided almost entirely by the walls of the punch mark and not deflected by irregularities in the surface of the stub.

leg-mend-4

Figure 4: Fine drilling.

A sensitive touch is needed with the drill, as one does not want it to come out on the face of the frame. Happily, there is usually a little space beyond the end of the stub and the drill can be felt breaking through. If you are confident that the drill hole is correctly centred, you follow up with a larger drill, in this case, one of 3 mm and if it still seems to be correctly centred, finish with one at tapping size. If it is off centre, increase the size of drill used until one wall of the tapped hole is reached and then pick out the remnants of the stub. This is most easily done with a tap of the correct size, but a stout scriber will also do the job. Figure 5 shows the final result of doing this.

leg-mend-5

Figure 5: Female thread liberated.

Preparing the leg is a matter of simple turning, though I imagine it could also be done with a file and hand drill. First the remains of the stub are faced off in the lathe and a hole of the correct tapping size drilled down the leg. This is then tapped and a screw of the correct size inserted until it jams. I generally add a small drop of Loctite to make sure, before cutting off the screw to a suitable length. Figure 6 shows the prepared leg ready to be inserted into the threaded hole in the frame.

leg-mend-6

Figure 6: New male thread inserted.

This method of drilling out a broken stub of thread can of course be used elsewhere when restoring instruments, though especial care needs to be used when the thread, say of brass, is stuck in a hole made of a softer metal like aluminium alloy. If the drill drifts off centre it may take the path of least resistance through the softer metal, leaving a mutilated stub and a new hole in the wrong place. This may need some creative bodging to correct…


Replacing the Pellicle of an MA1 sextant

$
0
0

This post is preceded by  “A Countinho-Pattern Bubble sextant’; “How to Refill C Plath Bubble Artificial Horizon”; “The SOLD KM2 Bubble Sextant”; “C Plath Bubble Horizon Attachment”;“A gummed up AN5851-1 averager”, “Bubble illumination of Mk V and AN 5851 bubble sextants” ,  ”Refilling Mark V/AN5851 bubble  chambers” ,  ”Overhaul of MkV/An5851 bubble chamber” ,  ”AN5851-1 : jammed shades carrousel” ,  ”A Byrd sextant restored” ,  ”Update on Byrd Aircraft Sextant”, “A nautical sextant bubble horizon” and “Sealing A10 vapour pressure bubble chambers.”

light-path

Figure 1: MA 1 light path diagram.

Figure 1 shows the light path diagram for the MA 1 aeronautical sextant click on it to enlarge). Its near relative, the MA 2 uses a spirit level as a horizontal reference, but the MA 1 uses a mirror whose surface is maintained horizontal by a hanging weight damped in fluid. Light from a bulb passes through a condenser lens system, through an orange-coloured reticle, through a thin transparent membrane or pellicle, through an objective lens and then is reflected off the mirror. On its return path it is reflected off the under surface of the pellicle into the eyepiece.

Rays from the observed object pass via the index prism and an objective lens system, are deflected through 90 degrees by a pentaprism and then pass via another reticle into the eye piece in such a way that the black lines of the object reticle, the orange lines of the mirror reticle and the observed object may be in view together. The object is kept in coincidence with the orange reticle, as far as possible in the centre of the field of view, as indicated by the object reticle.

The pellicle was probably made from flexible collodion, a substance based on nitro-cellulose that forms an exceedingly thin film, but which suffers from the disadvantage of being very delicate and prone to distortion and wrinkling if it becomes damp. Forty-odd years after manufacture, the dry nitrogen with which the instrument was filled has often been replaced by air and the dessicator has become saturated with water, so that the image of the orange reticle becomes distorted by wrinkles. While very thin transparent plastic films are now available in the form of food wrap, it seems to me to be much simpler to replace the pellicle by a microscope cover slip. Its thickness is about 0.14 mm and so light is reflected off both surfaces of the glass to give a double image of the horizontal reticle line. This is not necessarily a disadvantage, as it is easier to place an image of a star between lines than it is to superimpose the image upon a single line, though motion of the aircraft is likely to make this a moot point.

There is a method using food wrap and I include it as an appendix.

The first step is to remove the dessicator by withdrawing two countersunk screws circled in white in Figure 2. This makes it slightly easier to remove the left side of the instrument together with the shades mechanism and also allows the dessicant to be refreshed if the granules are pink or white. The end of the dessicator unscrews and the granules can then be tipped out onto a shallow tray and baked in an oven at 120  Celsius for 20 minutes or until they have regained a blue colour.

pellicle-renewal-001

Figure 2: Remove dessicator.

Then the four corner screws are removed as shown in Figure 3. Remove the screws completely before attempting to lift off the side cover. Then lift the rear of the cover a few millimetres and slide the cover backwards for a few millimetres, to avoid fouling the shades mechanism on the frame.

pellicle-renewal-002

Figure 3: Remove left cover.

This exposes the pellicle on its frame. Removal of two screws allows it to be lifted out for inspection, holding it by its edges (Figure 4).

pellicle-renewal-003

Figure 4: Remove pellicle frame.

If the pellicle appears to be flat and undamaged, dust particles may be removed by gently blowing dry air on to it or by very light brushing  with a soft camel hair brush. If you are ham-handed it is better to leave dust in place rather than risk damage to an intact pellicle. If, however, the pellicle is broken or wrinkled, remove its remains with a finger nail and then clean the front machined surface with ether solvent. It is then a simple matter to place three tiny drops of super glue on the frame and, using tweezers, to glue a microscope cover slip in place (Figure 5). A nicely worded request for a small handful of cover slips is unlikely to be refused at your local medical laboratory. They are perfectly clean as they come from the maker, so try to keep them that way.

pellicle-renewal-004

Figure 5: Replace pellicle with cover slip.

Figure 6 shows the eyepiece view after replacing the pellicle with a cover slip.

pellicle-renewal-006

Figure 6: View through eyepiece, using cover slip as semi-reflective mirror.

APPENDIX

Using food film as a pellicle replacement is slightly more difficult:

1)  Obtain a circular embroidery frame such as may be had for a very few dollars and stretch a piece of food film (Clingwrap, Gladwrap etc) over it, adjusting the frame until the film is perfectly flat and wrinkle free. Make sure that it is perfectly clean and free from finger marks.

2) After cleaning old pellicle off the frame, place a smear of two-part epoxy adhesive (e.g. Araldite) around the frame, just outside the flat machined area, avoiding placing adhesive on the flat surface itself.

3) Set the frame down on the centre of the film, adding a weight of a few hundred grams to hold it in place until the adhesive dries. Then trim off excess film with sharp nail scissors or the like.


A Battered Observator Sextant

$
0
0

By clicking figures with an asterisk * you can enlarge them to see more detail. Return to the text using the back arrow.

This post is preceded by “Restoration of an early C19 ebony quadrant”, “C Plath battery handle structure; “C Plath sextant lives again”; “C Plath Micrometer Sextant”; “A Damaged Rising Piece”, “SNO-T Mirror Bracket Repair”,  “A Worm Turns”, “The case of the broken screw”, and “Worm with wrong thread angle?”

ga

Frontispiece*: Before.

Recently I acquired a 1940’s  sextant by Observator of Rotterdam which I knew was not perfect, but the extent of the imperfections did not become fully apparent until it arrived about two weeks ago. The seller had very fairly pointed out a broken leg and a broken peg on the device that is supposed to secure the instrument in its case (Figure 1), and the absence of mirrors and their clips was evident from the photographs. Unfortunately, the second peg of the securing device gave way while in transit, so that the sextant rattled around in its case and the horizon mirror bracket got distorted (Figure 4), the telescope rising piece got both twisted and bent and the micrometer worm shaft got seriously bent (Figure 6).

leg-1

Figure 1: Broken leg and peg  as found

I have dealt with how to mend broken legs, using this instrument as an example, in my post of 7 October 2016, Mending Broken Legs, so will not write any more about it here.

The pegs on the securing device were riveted into a plate which was screwed firmly to the base of the case (Figure 2) and all that was needed to re-secure them was to clean up their bases and, using the ball of a ball-pein hammer, to rivet them back in their holes.

holding-device-001

Figure 2: Device for holding sextant in its case.

The device is not well suited to its task. The pegs each pass through a hole in the handle of the sextant and, projecting into the upper holes which is lined with a brass bush is a spring-loaded pin (Figure 3). This latter is supposed to engage in a groove in the upper peg, but, while it may locate the sextant, it does not secure it very well. I plan to add a couple of wooden buttresses to the lid of the case, so that when it is closed the sextant will be held securely.

holding-device-002

Figure 3: Spring-loaded pin that “secures” sextant.

The distorted horizon mirror bracket (Figure 4) had most of the distortion removed by giving a squeeze in a vice and then a few well-directed blows  with a soft-faced punch did the rest

mirror-bracket

Figure 4: Distorted horizon mirror bracket.

The extent of the damage to the telescope rising piece is not immediately apparent from Figure 5, though with a little imagination, a twist is apparent, and it was certainly obvious that the telescope was not pointing towards the horizon mirror. The objective lens was also canted downwards so that instead of clearing the index arm, it was jammed against it. Straightening the part simply involved removing the telescope and its ring and placing first the square upright in the vice to untwist the soft brass, followed by clamping the ring to straighten the upright in two dimensions.

rising-piece

Figure 5: Bent telescope rising piece.

Straightening the micrometer shaft was altogether more complex, as not only was the shaft bent, but the bracket that holds the index was also distorted (Figure 6).

shaft-1

Figure 6: Bent micrometer worm shaft.

A brief account of the micrometer mechanism will perhaps help the reader to appreciate the problem better. The parallel worm lies between two reduced portions of its shaft and the walls of each reduced portion are conical in shape. The parallel parts of the shaft that lie between the conical portions make no contact with the bearings. Only the conical parts do so and, if properly made, by no means a simple task, when assembled all axial and radial play is removed while still allowing the shaft to rotate freely (Figure 7). For an account of making a similar new micrometer shaft and worm, see my post of 6 July, 2009, A Worm Turns.

micrometer-shaft-001

Figure 7*: Micrometer shaft in its bearings

The bearings form part of what I have chosen to call the swing arm, a brass casting that is held between two trunnions in the form of screws with hardened, conical ends, that allow the arms and the included micrometer worm to swing in and out of engagement with the rack against the pressure of a leaf spring (Figures 8 and 10). Note how the index of the micrometer drum is carried on a slender bracket that is attached to the sides of the front bearing.

micrometer-shaft-003

Figure 8*: Swings arm and trunnion.

The trunnions are adjustable to allow all play to be taken up while allowing free rotation. The trunnions are then locked in place by means of lock nuts. The blocks in which they run are extended to form  keepers that prevents the index arm from lifting off the frame.

When straightening a bent shaft it is difficult to ensure that one does not end up with two bends in opposite directions, but in this case, the bend took place at the narrow parallel portion of the shaft that is not normally in contact with the bearing and which takes no part in its alignment. Figure 9 shows one way to straighten the shaft to restore its alignment with the worm.

shaft-straighten

Figure 9: Straightening the shaft under control.

The 15 mm diameter worm is held in an ER collet in the spindle of my milling machine and a 90 degree vee block is held in the machine vice as a guide to alignment. While the shaft rotates slowly, the position of the block is adjusted so that the point of maximum eccentricity is aligned midway between the sides of the bloc, when rotation is stopped and the machine table moved to give the shaft a nudge in the right direction. The shaft is alternately rotated and nudged until no eccentricity can be detected in the part of the shaft that carries the micrometer drum.This of course only guarantees that the drum and the worm are concentric, but these are the important alignments. While some slight eccentricity of the front bearing remained, it was of the order of only 0.03 mm.

The index bracket had taken on a curious shape and in trying to straighten it, it became partially detached from the side of the front bearing. As it had been soft soldered into place, I completed the detachment by heating with a small flame and this allowed me to straighten its slender sides using a combination of vice and punch. T

his then left me the problem of re-attaching it so that the index would be correctly aligned. Figure 10 shows how I did this (note too how this photo shows the trunnions and their mountings clearly).

copy-of-swing-arm-structure

Figure 10*: Soldering jig.

I first turned up a bush of the same diameter as the micrometer drum to fit in place of the drum, and of a length equal to the combined thickness of the drum plus index. I then bored out one end of the bush to a depth equal to that of the thickness of the index. When in place (Figure 11) the bracket could then be clamped to it in the correct orientation and the arms of the bracket sweated back into place with soft solder.

OLYMPUS DIGITAL CAMERA

Figure 11: Soldering jig in place.

Happily, when the micrometer mechanism was re-assembled, everything ran smoothly, but when I next have an auto-collimator out on my surface table I will check for eccentricity errors of the drum. None is visible to the naked eye. In the course of dismantling the index shades for painting and lubrication, the head of the (steel!) screw that prevents the shades mounting shaft from rotating broke off, leaving me with one last task, that of drilling out the broken screw and fitting a new brass one (Figure 12). The process is the same as for drilling out broken legs.

OLYMPUS DIGITAL CAMERA

Figure 12: Broken screw and its replacement

After making new mirrors (Posts of 11 February 2009 and 27 March 2011) and clips, all that remained was to take everything apart, clean, strip and respray everything, re-assembling, greasing and oiling where appropriate, and to re-finish the mahogany case (Figures 13 and 14).

ga-finished

Figure 13*: Finished sextant in its case

handle-1

Figure 14 * Rear face of finished instrument.

If you have enjoyed reading this blog post, you will probably enjoy owning a copy of my book, “The Nautical Sextant“. You may also enjoy reading my book “The Mariner’s Chronometer” Both are available through Amazon, Paradise Cay and Celestaire.


A Battered 1940’s Observator Sextant

$
0
0

You will find an account of the restoration of this sad instrument in the post for 20 October 2016 in the category “Interesting Overhaul Problems.”


Carl Plath’s earliest sextant.

$
0
0

This post was preceded by “C Plath Yachting sextant“ “Making a shades adjusting tool” and “Eighty years of Carl Plath Sextants”. Other posts on C Plath sextants may be found by entering “C Plath” in the search box on the right.

C Plath bought the business of David Filby, Hamburg’s member of Parliament, in 1862 and shortly after he disposed of the book and chart side of the business while retaining the nautical instrument side. Around about the time that he moved into the address known as Stubbenhuk 25, he acquired a dividing machine from Repsold, his former apprentice master, and began to make his own instruments, including sextants. A year or so ago I acquired an early C Plath sextant for a very modest sum on e-bay. It and its case were not in good condition and so I restored them, but other commitments have until now prevented me from writing about it.

Case as received

Figure 1: The case

Figure 1 shows the case as received, with shrinkage cracks in the top and signs of water damage. Much of the varnish had crumbled, so I stripped off all the old varnish from the outside, filled cracks, made good loose joints, re-lacquered the hardware, re-stained the mahogany and applied several coats of modern varnish to give the result shown in Figure 2. The corner joints are rebate joints, reinforced with steel pins at a time when most makers were using hand-cut corner dovetails. The top, however, is attached with brass screws, while the bottom is glued and pinned on, following the practice of nearly every maker throughout history. The pins tend to rust, being “out of sight, out of mind”.

Case restored

Figure 2: Case restored.

The interior  as received is shown in Figure 3. Apart from dust and many flakes of paint the green felt lining of the floor and roof of the box had decayed. Fortunately for the instrument, the pocket for the handle and the pads for the legs were attached by screws and glue which had not given way.

Interior as received

Figure 3: Interior as received

Cleaning the interior and fitting new felt  completed the restoration of the case, and restoring the instrument itself presented few problems as everything was present and intact. Figure 4 shows the back of the frame, which is a heavily ridged bronze casting. In the nineteenth and early twentieth century, a very large range of frame patterns was offered by the major makers, but it was not until the early part of the twentieth century that Plath left behind this initial pattern in favour of the ladder pattern, with the occasional three circle or “Dreikreis” pattern being offered (see my post for January 2010). Note the heavy re-inforcement in the areas where the telescope and horizon mirror brackets are mounted.

Rear as received

Figure 4: Frame before re-painting.

The traces of paint that remained were a pale green, but the sextant illustrated on page 50 of Friedrich Jerchow’s history of C Plath, From Sextant to Satellite Navigation, is painted black, so I surmise that the green represents perhaps a primer coat. At any event, I stripped it all off and re-coated the parts black, taking the illustration as a pattern. Figure 5 shows the sextant in its case after restoration.

Interior restored

Figure 5: After restoration

Figure 6 shows the kit of telescopes and other parts supplied. Well into the twentieth century, sextants were often supplied with several telescopes and supplementary eye-pieces. I doubt that there was ever a time when most of them were used at sea. The 6 x 16 Galilean telescope has a tiny field of view and the 10 x 17 inverting telescope is no better. There may have been a time when they were used on land with an artificial horizon to check on the rate of chronometers in distant ports of known longitude, but at sea the 3 x 28 Galilean was probably the one used most, with the ‘zero magnification” sighting tube being substituted in rough weather. The eyepiece shade may have been used to check index error using the sun, but again, most people would probably have used the horizon, as it is easier on the neck to do so.

Telescope kit

Figure 6: Telescope kit

The shades and mirror brackets are perfectly conventional and avoid the complications used by French makers in particular and also by Brandis and successors. The tangent screw is of some interest and is shown complete in Figure 7. With slight modification it was also used in the Dreikreis sextant before the micrometer sextant was developed by C Plath around about 1907.

Tangent screw

Figure 7: Tangent screw

The spring box, which I have called a “sliding block” in different designs, slides in a close-fitting pocket on the rear of the index arm expansion and can be clamped to the limb using the clamp. A leaf spring keeps the box in place when un-clamped. The end of the tangent screw bears on a tongue projecting from the back of the index arm against the pressure of a coil spring within the spring box. thus, as the screw is turned, the index arm moves along the arc in slow motion. On releasing the clamp, the index arm can be swung rapidly by hand. Figure 8, which shows the mechanism exploded, may help to make this clearer.

Tangent screw exploded

Figure 8: Tangent screw mechanism exploded.

The mechanism for raising and lowering the axis of the telescope so that more or less light from the horizon can enter it is shown in Figure 9. It represents an intermediate stage of complexity on its way to the simplicity of the second half of the twentieth century.

Rising piece

Figure 9: Telescope rise and fall.

A telescope bracket having a vee groove and flat machined into it is attached to the frame of the sextant. The rising piece of the telescope has a matching vee and flat to guide it up and down. The lower end of the rising piece has a threaded hole for a screw that is held captive in the telescope bracket, to that when the screw is rotated, the rising piece rises or descends. A clamp holds the rising piece at the selected height.

Arc and name

Figure 10: The arc.

The silver arc, let into the bronze limb, is divided to 10 minutes (Figure 10) and the silver vernier allows readings to ten seconds, though, as with many similar verniers, it is usually impossible to decide which particular pair of lines coincide. It is easier to decide which two pairs of lines just do not coincide and to choose the middle value between them. It bears the C Plath name in flowing copper plate script, a feature of Plath’s earlier sextants.

Serial and S

Figure 11: Serial number and inspection mark.

 Dr Andreas Philipp has kindly provided me with the date of early 1899 for the instrument, or at least, its certification by Deutsche Seewarte. He tells me that both “S” and “D S” were used irrespective of date. He also sent me an illustration from Plath’s number V catalogue of  1906, which I reproduce below (click on this image to enlarge it). Based on the D.S. records, it seems that between 1876 and 1901, Plath produced an average of only 27 sextants per year.

Cat photo 001.JPG

Catalogue entry 1906 (Courtesy of Dr Andreas Philipp)


Hughes and Son Admiralty pattern micrometer sextant

$
0
0

I wrote about a Hughes and Son Admiralty pattern vernier sextant on 23rd June 2011, concentrating on its telescopes, its rising piece for the latter and its sealed mirrors. Recently, I acquired an Admiralty pattern micrometer sextant, probably part of a batch ordered in the closing days of WWII. The main difference is in the micrometer mechanism while the index arm bearing, mirrors, shades and telescopes are essentially the same as in the vernier sextant, certified in March of 1939, so I will not cover that ground again. Figure 1 shows the instrument as advertised by the seller, who seems to have photographed it through a light green filter. This explains the green cast to the blue-grey paint (I have removed the bright green background).

As bought

Figure 1: As bought.

The sextant was in a rather grubby condition, with paint beginning to perish and flake off in parts. I suspect it had been well-used, rather than spending nearly all its life in a cupboard.

Figure 2 shows the front view after a complete strip-down and restoration. In it I have labelled the main parts of a micrometer section for the benefit of newcomers to my site, and those who may not yet have purchased my book “The Nautical Sextant”, which looks in great detail at the structure of these instruments.

A 1 GA front

Figure 2: Front view of restored sextant.

Figure 3 shows the rear (or right hand side when in use). Here it is possible to see why this sextant, weighing in at 2.05 kg (4.52 lb) is so heavy. The cast bronze frame is very heavily ribbed compared to most other sextants, and features like the rising piece, the Index arm bearing cover and the complex arrangements for sealing the mirrors have all added to the weight. Earlier Hughes and Son instruments with scale lighting made the battery handle out of wood, but this one is of molded Bakelite with a brass battery cover. Happily, it contained no batteries nor signs of corrosion.

A2 GA back

Figure 3: Rear view of restored sextant.

Figure 4 shows details of the micrometer mechanism. The worm engages with the rack, which is cut into the edge of the limb. The rack is in essence a segment of a worm wheel having 720 teeth. Also cut into the edge of the limb is a groove which accepts the free edge of the two keepers. These prevent the index arm from lifting off the limb.

A3 micrometer detail

Figure 4: Details of micrometer mechanism.

The axial pre-load spring, which is shown out of place, is U-shaped with one upright of the U being forked to embrace the worm shaft and press on the flange immediately to the left of the thrust bearing. The worm shaft inside the bearing is conical, so it aligns the shaft axially and radially with a further bearing providing more radial guidance. This spring is a simpler solution to providing thrust pre-load than the more complicated systems used by Hughes and other makers prior to WW II.

The worm is held in engagement with the rack by a beryllium-copper radial pre-load spring. A simple cam bears on an arm extending from the swing arm on which the bearings and worm are mounted. When the release catch is operated, the cam causes the swing arm to rotate around a substantial bearing  and the worm disengages so that the index arm can be swung rapidly to a new position. When the release catch is let go, the spring swings the worm back into engagement with the rack and rotation of the micrometer drum provides fine adjustment.

There is a guard extending from the swing arm to provide some protection to the micrometer drum and the worm shaft. The shaft is often bent when a sextant is dropped or knocked and, as replacement parts have long been unobtainable, a whole worm and shaft have to be made. See for example “A Worm Turns” on this site on 23rd June 2011. The worm itself receives some protection from a sheet metal cover, seen in Figure 3.

Figure 4 shows the front of the index arm in the area of the worm. The screw that secures the axis about which the swing arm rotates has been removed to show a washer that is prevented from rotating by two pins into the swing arm, so that the screw can be adjusted to remove end shake in the bearing, while preventing movement of the swing arm from loosening or tightening the screw.

A4 micrometer front

Figure 5: More micrometer details.

There seems to be little point in providing a vernier to the micrometer, as the racks of this era often had errors in excess of 0.5 minutes and in any case, observation errors due to uncertainties about refraction and dip would often swamp instrument errors. Most makers after WWII abandoned micrometer verniers, but some were still made, presumably to satisfy conservative mariners and military procurement officers.

This instrument was provided with a fairly comprehensive kit of telescope and tools, shown in Figure 6.  Most mariners probably never used anything other than the Galilean (“star”) telescopes in the 20th century.  The higher powered ones were probably used mainly for artificial horizon shots in ports of known longitude to correct chronometers. This was made obsolete by the advent of radio time signals, but Tamaya in particular continued to provide them to the very end of sextant manufacture.

A6 telescopes etc

Figure 7: Ancillaries.

The eyepiece shades are useful for finding the index or zero error of the sextant by looking at the sun or moon, but again, most mariners would simply have used combinations of horizon and index shades, or used the horizon to avoid strain on the neck from looking up at the sun.

A very useful feature of the Galilean telescopes is the provision of hoods to prevent glare from around the horizon mirror reaching the eye, as the hood limits the field of view to the mirror alone (Figure 8).

A5 telescope hood

Figure 8: Telescope hood.

Figure 9 shows the sextant and its telescopes etc. in its fine mahogany case. As usual from about 1900 onwards, the corners have box comb joints. In all Hughes and Son sextants, the handle is on the right hand side, to avoid setting down the box on its hinges.

A7 in box

Figure 9: The sextant in its case.

Figure 10, shows the case standing on its left hand side. This, together with the hook latches which always face to the left, so that they tend to remain latched in the carrying position, identifies the sextant as a Hughes and Son, if it were not obvious from the circular “Husun” emblem attached to the index arm.

A8 latches

Figure 10: Hook latches in closed position.

If you have enjoyed reading this account, you will find much more of the same in my book “The Nautical Sextant”, but do not expect to find anything about in it about navigation. It is about the structure of the sextant.You can find plenty of positive reviews of the book on the amazon.com web site.


A later Shackman sextant: a guest blog post.

$
0
0

John Triplett recently wrote to me about a Shackman sextant that he had acquired and kindly agreed to write a guest blog post. In what follows, comments that I make are shown in blue.

It wasn’t very long after I first read Bill’s blog entry on Shackman sextants (https://sextantbook.com/category/shackman-sextant-and-link-to-ramsden/) that I had the opportunity to acquire one, and at an extremely reasonable price.  I found the design to be unique and interesting, and wanted to see it up close.  I found this sextant in a recent eBay auction that was listed referencing its reseller, Kelvin & Wilfrid O. White of Boston, and not its maker, D. Shackman & Sons (Figure 1).

IMG_3143_preview

Figure 1: The sextant sitting on its case.

In making some needed repairs (the index arm was bent away from the limb and had to be straightened), it soon became apparent that there are some design differences between Bill’s sextant and mine.  My sextant has a later serial number (No. 3236) than Bill’s (No. 2262), and that does seem speak to some of the differences between the two pieces.  As of this writing, there is another Shackman sextant being offered on eBay (again, resold by Kelvin & Wilfrid O. White) with a serial number (No. 2097) even lower than Bill’s, and having characteristics of Bill’s earlier number, specifically the short tail and leaf spring on the index.    No. 2097 also has a 30” micrometer with a single index line, not a 10” micrometer with a vernier, so, either different precisions were made by Shackman, perhaps some for survey purposes and others for higher precision needs in navigation, or the more precise vernier was a later revision. Most non-British makers had by this time begun to abandon the vernier, perhaps recognising that errors due to uncertainty about the dip of the horizon tend to swamp instrumental errors, which in any case are sometimes of the order of 30 seconds. If greater precision is needed, it is easy to estimate to 0,2 degrees, but such precision is likely to be devoid of meaning, given that the instruments were calibrated at only 30, 60, 90 and 120 degrees.

It generally appeared to be in fine condition, very clean, and showing very little use.  As for the needed repairs, my best guess is that this sextant was dropped early in its career at the US Merchant Marine Academy (as the property label on the box suggests), and, once the owners discovered the nature of the damage, it was simply shelved and forgotten.  (This long convalescence is further evidenced by the light damage to the lid of the box:  papers left on the top for a long period resulted in a stark bleaching/darkening pattern from a masked exposure (See Fig 1.)  Some disassembly was required, and this process uncovered some of the aforementioned differences.

The noted differences to my No. 3236 are:

  • ‘Paddle’ or ‘spoon’ grip extensions on the index and worm that improve manipulation and placement of the micrometer movement. One of the ‘spoons’ is deformed from the drop impact. See Figure 2 for close up view.
  • Copy of IMG_3295_preview

    Figure 2: Damage to release catch “paddle”.

  • The leaf spring has been replaced with a coil spring and plunger system that applies and maintains the pressure of the worm against the rack. The spring slides in and bears on a curved groove on the underside of the opposite paddle grip (Figure 3).
  • Copy of IMG_3294_preview

    Figure 3: Radial helical pre-load spring.

  • The index journal bearing system has seen a design change from the keyed washer to a spring and washer. (This was discovered when the index arm was removed from the frame for repair.) This is such a strange arrangement that I think it must be a later and rather clumsy repair. The washer under the head of the screw does not seem to have a square hole, so there is nothing to stop the washer from working the screw loose as the latter rotates with the journal (Figure 4).
  • Resulting in part from some of the above changes, the later sextant is positioned differently in the case to allow room for the elongated worm assembly.

Ironically, the strength of the ribbed arm casting Bill references in his original blog either worked well or not at all, depending on how you look at it.  It certainly preserved the alignment of the ribbed section of the arm, but fully transferred the bending moment into the weakest part of the arm at the hole for the journal mount.  In agreement with Bill’s assessment, this inherent weakness certainly makes the arm rib a questionable design point, and an overkill in manufacturing.

As for the spring-and-plunger system, this could be considered the Achilles’ Heel of this design.  The spring seems, to me, to be undersized and understrength. Once the spring becomes weakened to a critical point, there is no longer sufficient pressure to keep the worm against the rack; the user has to consciously add the needed force by hand. (Perhaps this too was a later repair. The spring seen in Figure 3 should perhaps be a larger one that fits outside the fitting in which the foot of the spring presently sits.)  It is especially annoying in that it occurs mostly when you are trying to use it normally.  The worm tends to fall away from the rack rather than onto it as does, say, a Hezzanith Endless Tangent Screw.  When turned ‘backwards’, the worm tends to ‘bite’ the rack and assist the spring in holding against it; when turned ‘forward’, the worm throws itself away from the rack and works against the spring.  This tendency was especially pronounced when I first received the sextant and the rack and worm were dry.  After the repair, a proper oiling to the contacting parts greatly mitigated this effect, but it is still noticeable

Another observation on an avoidable issue is the cork padding on the case top braces that contact the ends of the limb and the scope.  In addition to being glued down, they are actually nailed in place.  My example has some shoddy factory work in this aspect as one nailed head was bent over, leaving the edge higher than the cork.  The bronze surface at the left end of the limb is fairly mangled up from years of contact.  Was this really necessary?  Simply gluing it would have been just as effective and far more maintenance friendly for replacement.  Happily, the DS&S logo on the other end has fared much better. Shackman’s were manufacturing jewellers pre-war and probably did not make the case. It may well be that more careful woodworkers were doing war work deemed to be more important, e.g. making the all-wood Mospquito aircraft.

IMG_3302_preview

Figure 4: Shoddy workmanship.

The Shackman sextant is, aesthetically, a very attractive piece.  The simple and elegant all-black frame is highlighted only by the bronze of the limb and truly tangent micrometer (and maybe some exposed scope slide), which, while giving a striking appearance, is also quite functional and uniform for usage – the eye is naturally drawn to the scales that need to be read, and in somewhat of a progressive manner.  Also, for a non-engineering, non-optical firm, Shackman’s optics are very good (although they could have been subcontracted).  The telescope is very bright and clear, noticeably more so than those of my instrument by Buff & Buff, a maker known for excellent optics.  It is not a perfect design, as Bill points out, and suffers from some over complexity and confusing ideas that needlessly reduce its functionality in other ways and, quite possibly, its accuracy.  While the solid bronze casting is strong and rigid, its significant weight is felt rather quickly when trying to make an observation.  Still, I find it to be, overall, a rare, unique, and lovely design that makes for a desirable addition to a collection, and I am enjoying becoming more familiar with it.

Thank you, John.


Viewing all 37 articles
Browse latest View live